5/22/13

Jolita Brilliant Shoot

One of my last shoots in NYC was done right in my neighborhood, West Harlem, with life fitness coach and prolific blogger Jolita Brilliant. I wanted to shoot some running as a followup to the work I did while out in Wyoming, which included these sweeping natural landscapes with a tiny runner in them.

A grittier, city-centric shoot came to be, planned around a highway overpass that had minimal traffic underneath, and was well away from areas that are more guarded by overzealous mall cop types.

I went easy on the modifiers, since we were walking to the shoot location. In fact, we ended up walking around 4 or 5 miles back and forth, playing with some different backdrops and lighting that the area had. Our warm up shots against this building were done with a fair amount of natural light creeping in from the river, less than 20 yards away. The metal siding on the building was fun to bounce light around on, and let me sneak a strobe in there while still looking surprisingly natural.

The final list of modifiers was the magnum reflector shown above and...nothing. The bare bulb continues to be a versatile light, especially in mimicking, adding to, or balancing sunlight. And shooting around 5 in the afternoon, we had a lot of sunlight from the west side of the city, right on the river.


We even squeezed in some no-light shots as the sun went down, with some cool shadows coming through the arches of this ironwork overpass. I've finally come to terms with natural light, and while I'll still go to Profoto right off the bat, sometimes you can do a lot with a little, or nothing at all. 


____________
Follow Me on Twitter | Be a fan on Facebook

5/13/13

Damn Ugly Adobe

From Damn Ugly Photography-Brad Trent, whom I assisted while living in NYC, is a blistering indictment of Adobe and it's practices in pricing, licensing, and now delivering via the cloud its software. 

His post nails it on the head as to why we should as photographers and other creatives tell Adobe that we don't want to license our software every month. Since Adobe is by far and away the first choice in photo manipulation, we may be held captive-but only if we slavishly update our software. 

Check out Brad's post and make your voice heard via the We The People and Change.org petition websites. Most importantly, make your dollars heard and spent on other software until Adobe remembers that it serves US as customers. 


____________
Follow Me on Twitter | Be a fan on Facebook

4/14/13

Studio Setup


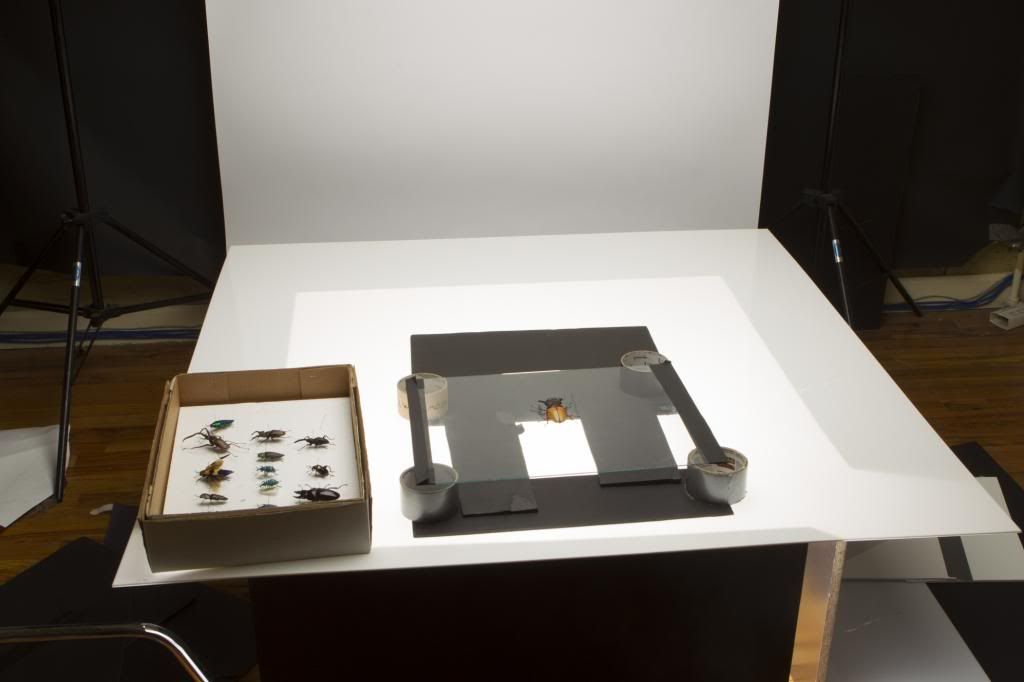
As a prelude to an upcoming announcement, I have a simple setup post to share. Drawing on experiences while I was at Hearst Publications, using a light underneath a layer of plexiglass with an elevated piece of regular glass as a shooting surface gives you a beautifully controllable way to shoot certain products on white.

While a white sweep and plexi (also a part of this setup) is great for shooting free-standing products, some things just need to be shot top down for various reasons. It can effectively be used on many other items as well, for a different perspective. I've used this setup for bottles to put the air bubble in front of the glass for a 'hey, wait a minute' reaction from people who expect the bottle to be standing upright.

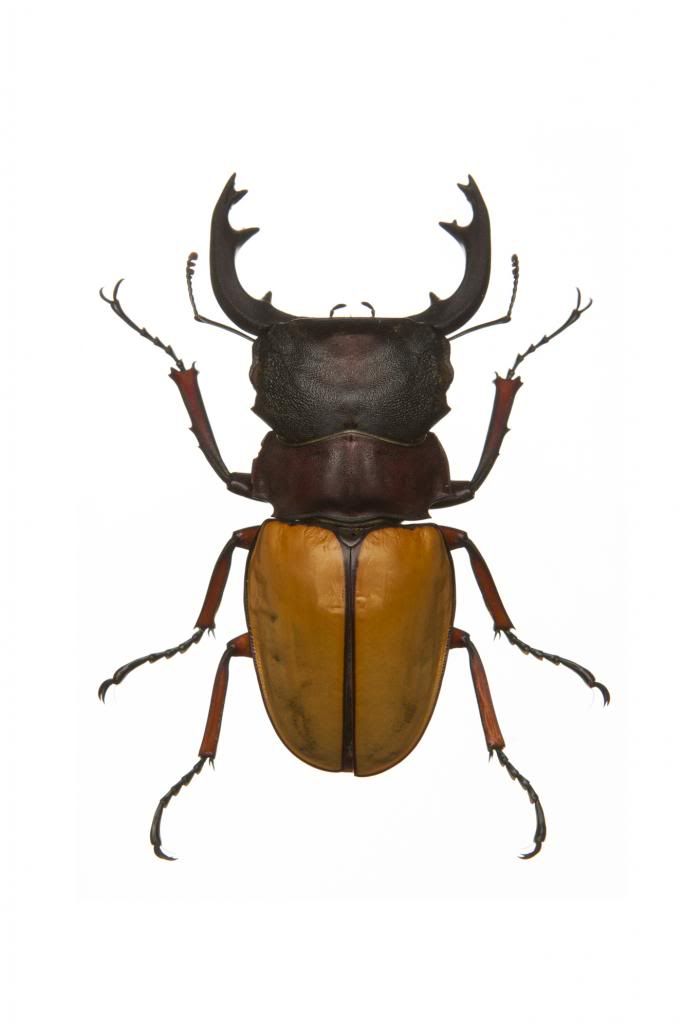
These insects are laid out to be displayed flat in frames, and none of them will stand upright on their own. Shooting flat was the only option. And while I've shot lots of products that gain depth and dimension from a shadow underneath them, these needed a pure white background for web. Nuking an item with a large softbox overhead is a possibility, but can also necessitate some cleanup and tweaking.

While first trying this out, you may be tempted to put your item right onto the backlight plexiglass and fire away. However, that extra layer of glass, with spacers underneath, makes a huge difference. The black cards are on the plexiglass and they control the flare that would otherwise wash out the sides and edges.

You want to constrain the item with cards all around, and as close as possible. If all the light is coming from directly underneath, it isn't hitting the sides. Then your main light, or lights, do the heavy lifting and let you sculpt and shape however you like.

In essence, we've taken a typical product sweep and flipped it 90 degrees back. Just make sure you set your exposure 1/3 to 1/2 stop brighter than the reading on the glass alone. This ensures a 100% white background, without overexposing the image from backlight alone.

This should be your final result (creepiness and number of legs may vary). 


____________
 Follow Me on Twitter | Be a fan on Facebook

3/1/13

Keeping Creative


If I were to use the phrase 'photographers block', I'm certain I would neither be the first, nor maybe even using the right term to describe what happens when you hit that wall, and can't come up with a single thing to shoot.

But it happens, the same as all creatives run into mental blocks one time, a dozen, or every day of their careers until they get around it, maybe to only find the next obstacle. Photography may be unique from some art forms in that it's both internal and external. You can have the best idea ever, but no means to execute it. Or, you could have all the equipment your heart desires, but nothing to use it on. We rely on internal ideas, and our environments to create our work.

Shooting tabletop as often as I have been these past months has given me a new host of challenges every day, for which I'm grateful. But at the end of the day, feeling somewhat drained and uninspired by pictures of products on white sweeps, I was having trouble getting out to do something different.

There are thousands of photographers offering hundreds of thousands of ideas to get you out and moving, but underneath the inspirational messages, I saw the same words. "Just go DO something." But thats the hardest thing to do on occasion, to get up, grab the camera, and enjoy it.

It took a cross country road trip, and a return to the west coast to remind me that I do in fact enjoy my job, and that the whole world is out there waiting for someone, anyone, to try something interesting. I had to remember that if its all been done before, it can't hurt to do it again, and that eventually I might be the first to do that one cool thing that escaped under the radar.

So for those of us who experience photographers block, or maybe dark cloth? you can read inspirational quotes and posts all day and get a million ideas in your head, but getting out there to do them is where we can all fall apart. I stopped carrying my camera with me every day once I had to for work, feeling like it was more of a bother. That's the block talking. This shot, from inside the airport, wouldn't have been done if I had given in, said I was tired from shooting all week, and left my camera buried deep in the bag.

Instead, it opened me up to a whole world of photography that I want to continue exploring, unleashed a flood of ideas that I pulled into every other category of work I do, and got me excited to be out and about, camera in hand, finger on the shutter.

The block will bring you down and make you feel like it isn't worth doing anymore, you have to find what will make you enjoy it again, not cave your head in thinking of one specific thing to accomplish. Try a new subject, a new edit, or even browse through your own catalog, critique your work, and do it over again. Let ideas come organically from yourself, and then match it to your existing environment.

____________
  Follow Me on Twitter | Be a fan on Facebook

10/9/12

Wyoming


I just got back from a week of backpacking, hiking, biking, white-water rafting and other general adventuring in Wyoming, in the middle of a forest fire. The smoke was so bad on arrival, you couldn't see past the terminal glowing in the early evening light. However, it ended up being some of the best light of the trip as the smoke filling the valley provided some diffuse sunlight through a slightly later hour than normal, maximizing my 6:00am wakeup.


Having access to great models can be the difference between a learning experience and new portfolio work. Some contacts put me in touch with models that are being sponsored by some big outdoor brands; Marmot, North Face, Patagonia and more. Though it isn't fair to just call them models-they're athletes, and some really good ones too. It's hard to keep up with a professional runner when your commute is three blocks and a subway ride.


Luckily, some great locations at Jackon Hole's Apres Vous Mountain look good coming and going, so I got to stand relatively still and let the athletes do the work.

And since most of the brands we covered make both active wear and mountaineering equipment, we got to spend a night out camping in view of the Grand Tetons.


The moon was actually full the night after this shot was taken-we had to wait for moonset at about 4:00am to wake up and get the stars behind the tent. An obliging camper was also awake and illuminating their tent for me, while several running cars, presumably with the not so enthusiastic campers sleeping in them, provided some fill on the trees. 30 degree temperatures left a nice sheet of frost on all of the equipment cases left out.


Much coffee was needed after all the early morning calls, running back and forth in the smoke that slowly lifted from the valley, and dragging lighting gear up and down the mountain.
____________
Follow Me on Twitter | Be a fan on Facebook

9/4/12

Bell & Ross

While it was quite the long and productive summer, with new jobs and clients, a road trip, and other comings and goings, one of my favorite shots is brand new, though the parts have been over a year in the making. Pictured is a Bell & Ross BR 01-94 Watch in front of a HGU-55 helmet, with an Aces II ejection seat as the backdrop. Yes, a real ejection seat, pulled from either an A-7 Corsair, that has been turned into my office chair. It's not the most practical chair ever, but it certainly grabs your attention. It'll be the subject of its own shoot in the future. I typically go overboard with lighting on watches, but this one was only two lights through a roll of diffusion on the side. It wasn't easy lining up to get the reflection on the visor to play nice with the watch face, but it paid off in the end to do it in one frame. Some text was added to the seat for a little break in the otherwise monotone image, and color was added back to the lower window since the coating made it look washed out.
___________
Follow Me on Twitter | Be a fan on Facebook

6/9/12

Adventure Time!

Sometimes, you quit your dayjob and take your tiny hybrid cross country in an attempt to find yourself, find your work, and get lost. I took 10 days to drive cross country, Detroit to Los Angeles, to do some photography I've never done before, but always wanted to try. Read on and see more images after the jump. Roadtrip 2012 06-08 California Alex Prius By the time I hit Las Vegas, it had been over 3,000 miles of empty highways, national parks, small towns you don't even notice, and the occasional buffalo to break the landscape. A couple nights spent in Yellowstone and Grand Teton National Parks, followed up by desert camping in Joshua Tree National Forest brought me back to summers spent at camp in Canada, and my inner Ansel Adams made an attempt (not developed yet) at serious landscapes with 4x5 film. Roadtrip 2012 06-02 Cody WY Rodeo Bullriding 1 I saw my first rodeo in Cody, Wyoming, in what was a daily event for them in the summer, bought a new cowboy hat that I really want to wear back in NYC, and probably won't. In California, I randomly picked a diner that just happened to be featured by Anthony Bourdain on 'No Reservations'-and it was the best breakfast food of my life. My camera lived under my legs in the car, I'd take nothing shots out the window while driving that never seemed to work out, but I'm glad I have them anyway. A few bottles of Jameson disappeared in the cold nights spent outside, and the slightly warmer night in Vegas took its toll as well. One of the challenges was learning how to use 4x5 film-between keeping track of exposed frames and how to store them in a box still half full of unexposed film. As well as the 8x10 that still has a bum lens that won't focus to infinity (hopefully to be replaced for the return trip). Roadtrip 2012 06-08 Joshua Tree Sunset But having that much time in the car, you learn about yourself, others, and remember why you do what you do. It was one of the most liberating experiences of my life, if not also a little harrowing when you're not sure if you can make it to the next town and find a motel that's still open with vacancies.
____________
Follow Me on Twitter | Be a fan on Facebook

4/14/12

Pro Globe Followup


As brief followup to the last post on the creation of the Home Depot Pro Globe in comparison to the $600 official version, I put these two modifiers head to head in a completely (not) scientifically benchmarked test.

Using my Acute 1200 and each modifier, I rattled off ten shots with each of an Xrite color checker at a properly metered f/8 1/200 5600k, pulled them into photoshop, made two lines, and then checked the color temperature and shifts from one exposure to the next, for both types of globes.

The long and short of it is that the Home Depot version will put a few more points of magenta into your images-something to consider for work showing a lot of skin. You'll need to counteract with a couple points of green to even it out, and that could possibly change the overall look of anything not lit by this modifier. My highest registered value was -15 green to white balance the Home Depot globe, vs -10 green for the Pro Globe. not a huge difference to me, but pixel-peepers may not approve.

I doubt that the shift will be outrageously noticeable in real world applications, and the savings of over $500 for what amounts to a plastic globe and universal speedring wipes any doubt from my mind that this will be an extremely useful mod.
____________
Follow Me on Twitter | Be a fan on Facebook

4/10/12

The 'Pro' Globe


While its certainly true you can slap on a home depot acrylic globe onto your alien bees or white lightning balcar mounts, it lacks a certain elegance and versatility, not to mention the fact that your flash tube is pretty close to the plastic. While you may not ever melt it, I’m one to be over cautious of my equipment and the flammable materials it comes near.

When I actually got my hands on a pro-globe, I was unimpressed by the hardware in relation to its price tag- approximately $300 for the globe or speedring separately. The globe has some nice holes drilled in it, and I’m sure it’s a special blend to be daylight balanced, but that’s about it. The speedring uses tension clips to hold on to the lip of the globe, putting a nice venting gap between the globe and speedring for added cooling.

I was convinced I could do better, for a fraction of the cost. It may or may not be daylight balanced, but it works, and with a very nice upgrade as well.

The original pro-globe is Profoto only. The DIY community, with a mix of lighting equipment and a desire to keep within a budget, is not the primary target of this modifier, thus the influx of modifiers that be used on nearly any type of light. My mod was created for all three kinds of lights I typically use: Alienbees/White Lightning, and my new Profoto Acute 1200 kit. I had just switched out some of the rings on my Alienbees soft boxes to be able to use them on my Profotos, when lightning struck and I figured if I can switch speedrings on those, why not on anything else that uses one?

Using a 12”, no-neck globe found on Amazon and a universal speedring from Calumet, I was able to buy the Profoto speedring insert that was the same size as the balcar inserts from the soft boxes. There were a dozen ways to attach the ring to the globe, most probably better than the one I chose, but drilling four 1/8th inch holes into the globe and threading 100lbs picture hanging wire to hold the ring on was what I ended up doing.

I gave myself a little slack on the wire to create that gap between the ring and globe, and ended up pinching the wires together using those hooks for hanging pictures (you’ll figure out that’s about the only materials I had). This made it so that there was no slop in that gap, so even if the mod is pointing upwards, the gap remains.

Using a 5/8” paddle bit, I promptly ruined my first globe by spinning all the way up and trying to jam it through. On the next globe, I very slowly started the hole, slowed down even more when the paddles hit the acrylic, and then spun up slowly as it began to eat up material.

The mod works best with the Profoto lights, and is what I basically plan on using it for. The adjustable depth you can get with the Profoto design lets you put the light deeper into the globe than the shallow balcar mount, though both work. The balcar mount lines up the flash tube almost even with the gap, creating a brighter line wherever that hits, but if you use the pro globe as a fill or main light up high, it won’t affect it at all.
So if you want to super deluxe your pro globe, here’s the shopping list

12” globe with 5.25” opening
Universal speedring
Alienbee/White lightning insert
Profoto insert

____________
Follow Me on Twitter | Be a fan on Facebook

1/31/12

Mistress Paige

Mistress Paige Pinup Bathing Suit 5
Sometime you get a really cool email. Like, 'I'm a professional dominatrix and I'd like you to shoot some pinup with me' kind of cool. How can you turn that down? And so, despite the job description, Mistress Paige is actually quite a nice girl, until you pay her not to be.

It was also a great chance to try out some new and upgraded equipment. I managed to snag 3 Broncolor Scoro packs that we had been demoing, along with a Hasselblad H4D60, the 40's bigger brother. I'm no stranger to Hasselblad equipment, but its always exciting to see files that come out to nearly 9,000 pixels long and 400+mb tiffs. I Immediately regretted not having a larger external drive to shoot to with me, but we managed to squeeze in over ten gigs of raw files in just about an hour of shooting.

Broncolor packs are known for two things-speed and color accuracy. I've been shooting Profoto for nearly everything up until this point, but the Broncolors blew me away. Dead accurate colors frame to frame is always nice to see, and saves me a lot of time in post work.

And while we didn't really have the subject matter to test out the speed, or flash duration of this particular pack, I did see how I could dial up insanely fast flashes with decent output for the other sports related work that I like to shoot. And the packs are crazy light, which was great since I had to set up and tear down pretty fast, without an assistant.

Mistress Paige, being a thorough professional, came with her hair and makeup already done. This being New York, she told me that she had just gotten off work a few hours ago, re-done her makeup, and come right to our mid-morning shoot. If she was as tired as I was, it didn't show, and she even humored me when I asked her to pose with the last Scoro pack, for posterity's sake of course.

Mistress Paige Pinup Bathing Suit 2


____________
Follow Me on Twitter | Be a fan on Facebook