10/14/10

Alex Minkin Promo Video


Alex Minkin Promo Video
Originally uploaded by Alex Minkin

Finally got a promo video up of some of my work from the past year

9/24/10

You've got to check this out


This is the newly released trailer from the project I helped photograph over the summer, CSI's Anthony Zuiker delivers a huge action packed digi novel- Level 26: Dark Origins. The series of cyber-bridges was shot exclusively on the 5dmkII, the same camera I was using at the time to capture behind the scene stills and video to be used in the upcoming iPad app. Be sure to check it out and pre-order the book or catch it in stores.


____________
Follow Me on Twitter|Be a fan on Facebook|Tumblr|Ustream

8/24/10

Old Shots-Jen and Wojo

Jen Johnson Golf Portrait 2

This was a shot from back in school, and was one of my somewhat ridiculously large setups. Seven lights are in here, think you can spot them all? Check out how I did it after the jump.

thanks to flickr user j.cleveland I remembered to finally make the lighting diagram for this picture. It took me a minute to figure out my own lighting, but the in studio stuff can be predictable at times, so deconstructing it wasn't too bad. Then I remembered I posted the lights used on flickr. Typical.

Two softboxes on the background start off this high key image. Metered a generous 2 stops over my planned subject exposure (f/5.6 subject, f/8-11ish on the background). I chose a fairly wide aperture to get even more depth of field out of this picture. A long lens and compression can do the job for you, but only if you have the working space to do it. I was a little crammed in there, so wide open was easier than hitting the wall.

The two strips on either side of Jen are gobo'd off for flare control. If you can't see the light source, it can't make a flare even if its hitting your subject. Black cards don't bounce much light, so you're also not worrying about spill.

The beauty dish above Jen was one of my favorite lights all year. It has great falloff, and near softbox quality soft light. The last two lights are on either side of Jen's arm sticking through the Gobos, at about equal power. The top of the ball is being ever so slightly lit by the beauty dish, and the back of her hand and arm is all grid.

Setup Jen Golf Shot Lighting Diagram

This is the rough lighting diagram, and what Jared may not know is that nearly the same setup was used the same day for another shot, this one:
Andrew Wojo Glock 3

I used the same setup for a couple reasons. Working without an assistant is tiring sometimes. And Wojo's shot was actually the test for Jen's, but since we had two completely different subjects, I felt that repeating a lighting pattern wouldn't be too egregious a sin.
____________
Follow Me on Twitter|Be a fan on Facebook|Tumblr|Ustream

8/9/10

Retro-Vintage-Old School

Katie Mundinger Pinup 2
Photographing in the style of another time period is a great exercise in nearly every area of photography. You're re-creating lighting, wardrobe, editing and, in some cases, the very media you're using.

And while pinup isn't exactly something that's lacking on the interwebs, going back around 70 years to an art style that fell out of common usage long ago is one of the coolest things I've done this summer.

I chose pinups because of the huge range of imagery possible-the different styles, mediums, and even purpose you can choose. I decided the logical place to start is with the classic pinups mostly inspired by Alberto Vargas. While I decided to go with girls wearing more clothing than he normally depicted, the pure white backgrounds, popping colors and an incredible sense of light are all true to his paintings. Part of the editing process even brought in a painterly feeling for that little disconnect from the modern digital photography that captured it.

Check out more pictures, the lighting setup and some processing after the jump.

Planning these shoots was fairly straight forward. My models were told to research Alberto Vargas, Bettie Page, and the pinup genre in general for clothing. Hair was simply curled and taken up for most of the shots, let down for others. The one absolute necessity to me was having the deep red lips. We took test shots before makeup, and you could tell something just didn't look right.

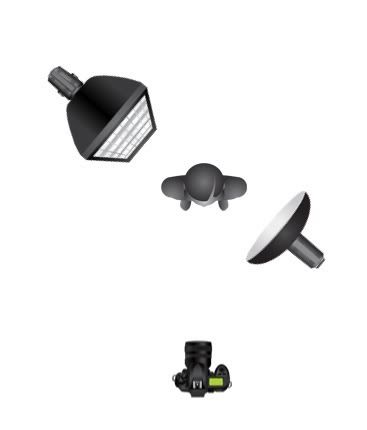
The lighting setup was one of the larger setups I've used for something that looks deceptively straight forward, and I still haven't perfected it yet. Total count-6 lights, or rather, every light I own right now.

Setup Pinup Lighting Diagram

Three lights on the background, two in softboxes on the side and one magic-armed to the ceiling with a bare reflector nuked the background to nearly pure white. I could have pathed out the model off of any background, but some of the flare from the background gave me part of the look I was looking for.

Two lights in grids were positioned behind the model at an angle. It was important that these two were never actually visible to the camera-way too much flare if they were. The background softboxes provided gobos, but light stands with poster boards attached would have worked if I needed to change the angles.

The main light was in an Alien Bee PLM system, which is really a glorified bounce umbrella. It's supposed to be more efficient, but I never had to test that since I shot relatively open at f/6.3-8, never straining my lights at all. Faster recycles, less eye strain on the model and a shallower depth of field are all bonuses.

Where I was lacking light was a fill which would have been positioned right next to me in front of the model. The PLM is huge, so it has to be pretty far to the side. The opposite side of the model would go dark pretty fast from the light falloff, so a fill would have given me slightly less of a ratio, but still be really nice, sculpted light.

With the background nearly pure white, the PLM was lighting my model and foreground. The tileboards I put down on the floor disappear into the curve of the 9' seamless paper, and the bottom half gets painted over in photoshop, as do any gaps or irregularities.

The light makes the picture look like it's straight off a page of watercolor paper, and then I enhance it even more in photoshop. First, stray bits of background are painted white, covering the bottom of the background, sides peaking around, and anything that shows up that isn't supposed to be there. Skin is retouched if required, and liquifying is done now, so we don't change masks later.

A layer of curves brightens the whole image, skin tones and background. If an area like a knee or an elbow is blown out, it will disappear so I mask those areas back in, and then brighten them individually with the dodge tool.

A second layer of curves pulled down, only affects the model, since our background is 100% white. This provides a punch of color, contrast, and usually, too much red. A hue/saturation layer with the red channel selected pulls down the reds just a little, and I mask in red clothing, accessories and lips.

Then I just go crazy with curves, using them to increase contrast or brightness in individual areas. Legs and eyes usually get brightened a little, hair gets added contrast, and the overall image is brought up to near the final look. Masks are on every individual part so I can fine-tune as much as I want. Dodging and burning is done on a 50% gray/softlight layer, usually on clothing to give it some pop and depth.

If the photoshop didn't scramble your brains a little bit, here's the finished product to finish the job for you.

Sharon Alpert 1940's Pinup Black Corset 1

Shira Andronaco 1940's Pinup Green Dress White Scarf 2

Jeri Glomstead Pinup 3


____________
Follow Me on Twitter|Be a fan on Facebook|Tumblr|Ustream

7/28/10

Aren't you a little short for a stormtrooper?

Alex Minkin Stormtrooper Barbecue
Actually, i'm just about the right height. Not that I'm considering a career change or anything, but being the goon in full armor is pretty cool. Figuratively at least, because plastic armor and a full body suit make for one sweaty photographer. But I've never had more fun on a shoot than with this. More after the jump.

Costume rentals are starting to be the dominating feature of my budget when it comes to doing my independent shoots. But wardrobe has always been a hard to find item, and is usually the one thing I've had to rely completely on my models to provide for themselves.

But rental shops can be hard to find sometimes. One that was very close to where I work went out of business years before I even picked up a camera. Now, my nearest reliable source is a 45 minute drive each way. Worthwhile for big concepts, but combined with the price (stormtrooper armor is $100 for up to a 3 day rental), it's something that needs to be planned out a bit more in advance.

But as you may have seen, I sometimes neglect to plan things entirely out. Like the fact I was lacking both a blaster and the right boots. I ended up wearing some Nike's (ironic since Adidas made licensed Star Wars shoes) and ski boot liners. Neither was a perfect match, but the ski liners ended up being acceptable. Improvisation is an important skill in photography, and I seem to inadvertently test myself rather frequently.

Alex Minkin Stormtrooper 1
But mismatched shoes aside, there was one major issue in shooting this piece specifically. It's white. All white. And I wanted to shoot it on a white background. Holding the edges on the lit side proved exceedingly difficult, the thigh and calf nearly disappeared into the background.

I did get to try a light modifier I under-utilized at school and never had the chance to use at home. The PCB Parabolic, basically a giant 6' odd silver bounce umbrella with a giant diffusion panel. Huge, soft light close up look absolutely gorgeous, and nothing is bigger than this. It's super even since it's bouncing from the light to the back of the mod before it hits the diffusion, unlike a giant softbox which has a hotspot and quick falloff. This is definitely a great mod to use for full length shots.

My old modifier of choice was the PCB Giant softbox, which you could fit two or three people standing up inside. But with the aforementioned hotspots and falloff, it made full lengths difficult sometimes. Light would falloff at either the head or feet, and since an unlit head doesn't do a portrait photographer any good, legs and feet were usually neglected and shifted in color temperature. The new PCB Parabolic doesn't seem to have that problem as much.

I do still miss the Profotos a little bit, especially for commercial work, but now I'm finding that I'm also missing the C-Stands we kept in the commercial bays. They're ultra-sturdy, stable, and support a lot of weight. Even my heavy duty stands bend when they have a boom arm and a small softbox, and I've had two try to take a dive already. But no more new equipment till the big move to LA.

____________
Follow Me on Twitter|Be a fan on Facebook|Tumblr|Ustream

7/19/10

Level 26-Video on the 5DmkII

If you're interested in shooting high quality video on your DSLR, check out this post from Anthony Zuiker's Level 26 blog where they discuss using the 5dmkII for filming, and give me a little shout out for my behind the scenes work.
____________
Follow Me on Twitter|Be a fan on Facebook|Tumblr|Ustream

6/18/10

Photoshop-How to

Giving the video tutorial a try here, check out how I did some of the editing and arrangement on the mock poster I made for Joan of Arc.


____________
Follow Me on Twitter|Be a fan on Facebook|Tumblr|Ustream

6/16/10

HOW TO: Make a movie poster

Commercial Joan of Arc Movie Poster Alex Adam Laure Lena
Sometimes, inspiration (or a lack of laziness) hits right after you could really use it. It's never a bad thing to have it come, but if it had just been a little sooner, maybe you could have turned in a really cool, full blown movie poster for your final portfolio review.

My lack of laziness came two days ago, when I decided that two weeks without shooting and nearly a month without blogging was getting to be excessive. Sure I had things to do, packing up to move back to Michigan, looking for a job in California, but I go a little stir-crazy when I'm not shooting or editing something

And sometimes 'something' turns into a project a little bigger than you imagined. I had just rented a bunch of costumes (King Henry VIII, a chain mail jacket and hood and a full suit of plastic armor) when I decided a movie poster for the non-existant summer blockbuster release of "Joan of Arc" would be fun to make.

See the lighting diagram, photoshop hints and more after the jump.

Unfortunately, that's about as far as my planning went. I shot two models as potentials for Joan, a friend for King Henry, and myself as a knight in shining armor. The armor may have been plastic and not very shiny, but I can work around that.

The 'How To' portion of this starts with some advice on movie poster lighting. It can be any lighting, obviously, but consistency is going to be key. I shot myself and my friend Laure with two different light setups, making it look really weird initially. Keep the lighting the same when the situation (layout, theme, etc) calls for it.

Everyone was shot on a black background with the same lighting-beauty dish main, high up, no fill, and a striplight kicker on the back for some rim and separation light. It's very simple, dramatic lighting. The pattern on the face is Rembrandt-triangle of light under the eye, heavy shadows without fill. All the pictures were shot on a medium format Leaf digital back.

Photobucket

The next part was editing each individual picture in photoshop. I wanted dark, dramatic and a little grungy. Desaturated layers with different blending modes along with some high pass and just a touch of dodge and burn gave me the effect I wanted. It's almost simple enough to make an action and save myself some time doing it.

With each person shot on a black background (which may or may not have been a mistake) the next part was the arrangement and masking of each person. A bunch of different layouts were tried, changed, and altered as three more people were added into the shot to fill in some negative space. The masking was mostly done by pathing people out with the pen tool when edges permitted, with a little bit of a feather to soften their transitions.

Hair is the trickiest part about something like this. I relied on the background to cover up most of the places where I couldn't accurately mask out long hair, which is where the black background was a good choice. It was still difficult in masking out Laure on the bottom right, as her head is right over Lena's armor. That section took a little more tweaking to get it to flow correctly.

Once everyone was in position, text was chosen and blocked out. I'm lucky enough to have a teacher who specializes in typography and designing layouts, so with her assistance we spaced out letters, centered everything to the middle of the frame, and chose an appropriate design for the title. The title font is "northwood high' and the credit text is 'sf movie poster condensed', both of which are available at Dafont.

The shooting itself took only a few hours, with a re-shoot to match all the lighting patterns and fix some costume errors, and editing the pictures themselves was only ten minutes apiece. The layout tweaking and typography took the rest of the two days this poster took from start to finish.


____________
Follow Me on Twitter|Be a fan on Facebook|Tumblr|Ustream

5/23/10

Level 26


I'm writing this from the set of Level 26 on the CBS lot in Hollywood, CA. I was brought on to do some behind the scenes stills and video for them, and it's been a blast so far. We're working on the actual sets they use for CSI NY, so it's pretty cool.

Anthony Zuiker is directing the cyber-bridges that get linked to from the accompanying books, and this one is due out in october. I got a chance to read book one after wrapping the first two days, and it's a really intense crime novel, definitely worth checking out. See some behind the scenes pics after the break.

Michael Ironsides as Tom Riggins
Dark Prophecy 9

Daniel Buran as Steve Dark
Dark Prophecy 2

Steve Dark's murdered foster family
Dark Prophecy 5

The crime scene was one of the first we shot, and the makeup guys did an awesome job making everyone look appropriately dead.

Dark Prophecy 27

We're shooting straight through till thursday, so there's going to be tons more pics to follow.
____________
Follow Me on Twitter|Be a fan on Facebook|Tumblr|Ustream

5/22/10

LA-in brief


Pics are being sorted and edited from today, over 400 frames of behind the scenes from something I'm not sure I can talk too much about. Suffice to say it's probably the coolest thing I've ever worked on, and despite 7am calls and wraps at 10pm, I'm having a blast. Pics and info coming as soon as I make sure it's all cool. ____________ Follow Me on Twitter|Be a fan on Facebook|Tumblr|Ustream

5/7/10

Wheels Up


'Wheels up' seems to be the appropriate title for this latest set and for the mentality of Hallmark as we hit the three-weeks-till-portfolios-due mark. People are finalizing plans for after school, and shooting, editing or printing every day. When I was told by former students that they 'lived' at the school, I have to admit I didn't think they really meant it like this.

These two pictures took two full days to shoot, composite, and edit down. After the results I got from shooting the small-sized cars, I realized that there are lots of really cool models out there. This 4th fighter group P-51 Mustang model, courtesy of Len at p51mustangmodels.com is so realistic its crazy.

I had originally wanted to build a set to show off this plane in the hangar for a still life, but finding a suitable replacement for hangar doors and concrete floors led me to source images from an actual hangar and create a composite instead.

It took a lot of trial and error with scaling, faking depth of field using blur, and creating studio lighting to mimic the conditions the plane was actually shot under, but eventually it all came together. A vintage look completed this picture, something I don't normally do but it seemed to fit well with the feel of the whole image.

While about 8 hours of composite work and tweaking went into the hangar shot, the flying shot up top was much simpler. Matching the feel of a huge light source is as easy as putting a softbox over everything. I threw in a bare bulb camera right to give it a little edge, like sunlight coming through the clouds for just a second. I'm not sure I really got the propeller quite right yet, but I love the yellow circle from the cuffs.

While I'm not quite sure I want to shoot miniatures all the time, it's a nice substitute until I can get my foot in the door to shoot the real thing.


____________
Follow Me on Twitter|Be a fan on Facebook|Tumblr|Ustream

5/3/10

Built to Scale

I'm a camera collector, and a bit of an everything else enthusiast. I like planes, fast cars, gadgets, you name it, and I probably have at least one piece of it. The one thing I never really got in to though was models. I suppose a model meant to me that I was never going to have the full size one, and since I strongly disagree with that, I've never made an effort.

But after our open house at school where a few of my friends brought in a hot rod and the necessary 40 foot scrims and thousands of watt seconds, I had a hankering to shoot a car. And while getting a cool car isn't difficult at times, getting those expensive scrims and the space to hang them is pretty hard. Check out how I managed to pull it off, after the jump.

Like I said, scrims costing $2,000 apiece and a car-sized studio aren't easy to come by. But a very elegant solution was presented when I stopped at home and remembered the wall full of scale model cars sitting there. I fit three of them in my carry on luggage, and shot them all in one day. I even learned about lighting large objects at the same time.

Now I know someone out there is going to be wondering how you learn about lighting a car from shooting a model smaller than a foot long. But the lighting principles are the same, no matter the size of the model. It was easy to see the mechanics at work, so now equipment aside, lighting a car is something I'd be comfortable doing for a client.

The first thing to remember about cars is that they're shiny. Really, really shiny. And rounded. They reflect *everything* they see, just like metal. And then they're big. Not in this case, but a real one is.

So when you have a big, shiny, round reflective item, you need a huge light source. Here's where you're learning on small scale for real life. A 10" model that represents a 14' car needs a similarly scaled light source. That 40' scrim suddenly shrinks to a 3x4 softbox, and it's a whole lot easier to move around.

The last thing to consider is the height of the softbox in relation to the model. Remember, that 10" is now 14', and we all know that the closer the light source, the better the light will look. Here's the real world scaling problem. The softbox needs to be about 4" away from the car. Closer if you can manage it, but my diffusion material was sagging in the middle.

Your camera, on the other hand, did not shrink with the car. So now you're jamming a full sized lens into a mini car studio. That front element is now 10' tall, comparatively, and unless it's really long, it's going to be like using a wide angle lens, which can distort the lines of the car.


I had a lot of extra material around all the cars I shot. You can see the softbox in the top, and even the tape holding down the gray seamless I was using. That led to some interesting editing choices, between cutting, stretching and blurring the floor to cover the bottom of the frame, and blacking out the top using the gradient tool.

I did two edits of three shots with each car, a fully revealed side, a concealed side, and a concealed 3/4 view. I like the concealed view because it just shows the lines of these gorgeous tiny cars, a la Ken Brown who was definitely the inspiration for these pics. He's got this down to a science, and I'm just playing with toys.

Still, working with something on a small scale and working up to the big league sounds like the way to go for me. And if you don't tell anyone it's a toy, I won't.

____________
Follow Me on Twitter|Be a fan on Facebook|Tumblr|Ustream

4/28/10

Back in Gear


Being a photographer 24/7 sounds like a great job, and trust me, it is. But it's still easy to burn out when you're constantly shooting assignments without time to explore and create images for yourself. Having to follow a set of instructions from a client or instructor can really suck all the fun out of shooting, and even if you're happy with the end result, getting there just wasn't a great experience.

So thats why despite having a vague idea to re-shoot some material for school, I blew all that off, created pictures the way I wanted, edited the way I wanted, and came out feeling like a load of bricks was lifted off me creatively. I saw light on my subject clearer than I have in days, and I knew how each frame would turn out before I even saw it on the monitor.

More about funks, getting out of them, and this one cool kid after the jump.

Felixx Ray (myspace) is a Massachusetts based R&B artist that had his manager contacted me to shoot a few weeks ago. We came up with a date and promptly did no pre-production. I was supposed to give him a general idea of wardrobe, but when I talked with Felixx to confirm the booking, I guess it slipped my mind. Bright orange and blue shirts weren't at the top of my list, but then I realized.

I was shooting for myself.

And for a client, but a client who wanted me to do what I think I do best. Just make a cool picture. Not worrying about lighting ratios (not that I worried much to begin with) or separation lights (which are evidently there for a reason), I had an idea of how I wanted the light to be, and I ran with it. I wasn't going crazy and making something selfish, Felixx and I had some good dialogue on which pictures we liked, which poses worked, and he seemed to really like the raw pictures on the screen.

While editing them, I even fell into a few old comfortable habits that I had left behind when I came to school. But they were different, a little better, and still me. If you looked at my old work compared to my new, you can tell it's me, but a more refined me. And that was one of my major goals in taking this year off for school.

When I book musical talent, I usually don't listen to their music before we work together. I'm not sure if that's a good idea or not, but I like to hear about their career right from them. Felixx and I didn't even get around to talking about his music, which I finally turned on while editing. And he's good. Real good. Get this kid a record deal good. He only has two songs on his myspace right now, and they're both Grade A awesome.

Check out the music portfolio on my site for pics from the shoot, and sign up for the mailing list to see even more.

Follow Me on Twitter|Be a fan on Facebook|Tumblr|Ustream

4/24/10

Deerfield Academy


I spent today shooting with one of my friends, Laure at the Deerfield Academy in Massachusetts. They have an awesome sports program and an amazing track and field, so pulling off some portfolio-worthy shots was all on me, no backgrounds to blame this time.

I'm usually known for my lighting or photoshop, and these pictures lack both of those. All natural light, not even a speedlight to pop some fill in, and post was done almost exclusively in lightroom, except for removing some errant tree tops and the like. Check out some more after the break.


Sports photography relies on long, fast lenses, the most popular being the 70-200 f/2.8 IS, the quintessential lens for nearly any type of photography. While I did run into an enthusiastic parent with a 400 f/2.8 IS and a 1DMK4, the 70-200 covered most of my focal lengths. The 100-400 f/4.5-5.6 IS is also a great lens that I used early in the day, before switching to the 70-200 as the light fell off.

I'm of the opinion that sports photography, whether high school or pro, relies a lot on luck and good timing. The skill is in knowing where to be and when to be there, but if nothing is happening in front of you, all the equipment in the world can't save you. I spent a lot of time walking back and forth to events for practice runs, where I got my own practice in. This shot of the long jump is where all the luck came in. Getting to the end of the sand pit was no challenge, and getting that awesome spray of sand was pure luck, made slightly more difficult by the slow framerate of the 5DMKII.

The 5DMKII is a great portrait camera, but not necessarily good for sports. the 1D series (no S) is renowned for its speed, and users complain more of having too many good shots to choose from rather than a lack thereof. the 5DMKII shoots at less than half the speed of the 1D, so timing, even for multiple frames, is important, as many great shots can get lost in between one frame to the next.


Typically, the longer the lens in sports, the better. Unless you can get on the field. And unless you can get right next to the crash pad, so close in fact that you have to dodge the occasional pole vaulter landing. While I didn't go as wide as my camera bag allows me to, the 24-70 f/2.8 is an amazing lens, and is probably my most used. At 24mm there's a little distortion, but not bad at all, and the quality is tack sharp.

Shooting up into the sky has become a bit of my trademark, though I usually do it with a few hundred wattseconds of light hitting my subject. Putting the sun to my side with a still bright early afternoon sky in front gives me that look of balancing the ambient with flash, without having to worry about slow sync speeds. A speedlight would have been great to put a little fill into the bottom of the athlete, but I was traveling light for the day.

While I'm primarily an advertising photographer, being able to do the candids out on the field is a much better way to spend a day than in a studio. I'm starting to balance out my portfolio as school comes to an end, and there may be a few surprises left yet.


Follow Me on Twitter|Be a fan on Facebook|Tumblr|Ustream

4/21/10

Sobe Lifewater-Composite


Phase 4 is going smoothly for most of the students here as we go through mid-term reviews of our final portfolios. One of my images, this mock Sobe Lifewater ad is being submitted for my composite project, and I'll show you a little insight into how I made it.

One of the many golden rules of photography is that the more you can do in camera, the more realistic the results will be. I tend to treat this more like a rule of thumb, and I think I've successfully gotten around it this time. Read more after the break.

Not to say that this wasn't an exercise in how many times I could pound my head against the wall without it falling off. I had never shot water for composites before, so there was a fair amount of trial and error (and spilled soft drink) before I hit the right combinations needed.


From looking at this screenshot of my layers for this picture, it actually doesn't look too bad. But this is the finished version, with the 20+ splash layers condensed to save space and my sanity in trying to find each element.

Starting from the bottom with a blank layer as the background, we have the layer for the splashes behind the bottle, with its color layer, then the bottle, masked for some translucency at the bottom, then the splash in front with color, droplets with color, effects layer for dimensionality, and then the collapsed text group.

These layers are just the finished elements used to save the final image. The working file, at any given point in time, had upwards of 50 layers, some just experimental, others that were deleted, and many that were combined into the front and back splash layers.

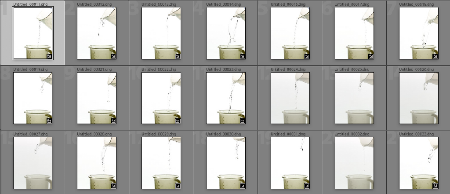
How we got those individual layers is pretty interesting, so here's a screenshot of my lightroom catalog with the final images I shot of water droplets that were comped in.


Each of these water shots, similar to the pours that built up the base and the actual splash, were cut out, adjusted, and then colored after being placed in position in the final image. over 30 different pours, drops and splashes were used to construct the liquid elements, with a fair amount of warping, liquify and cloning to integrate them all together.

All the liquids were shot being poured from one container into another, and captured with a Toyo 4x5 and the Leaf Aptus 22. Probably not the best choice for speed, since the Toyo has to be re-cocked after every shot, but the image size and quality gave me more options when it came time to fill in gaps. The final image is just as large as if it were captured with one frame, no need to downsize to fit lower quality elements.

The bottle itself was the easiest piece to shoot, just three softboxes, one of either side and over overtop. It lacked a hard edge which I added in post, but having it too sharp would have ruined the illusion of movement. There's a fine line between physics and advertising, with each having to win in certain situations.

All told, it may be easier to shoot this in one frame, but to line everything up properly, while showing enough of the label to satisfy a client, and enough splash to make the consumer think it just might be real would be prohibitively time consuming. I prefer the total control I get while shooting the elements separately and combining them, tweaking them, and molding them to my needs.
____________
Follow Me on Twitter|Be a fan on Facebook|Tumblr|Ustream

3/29/10

Nifty Fifty and The Wild West


Spring break was some well deserved time off from school, and despite our teacher's oddly specific instructions to *not* do photography, I did squeeze my stripped down 5dMKII and a single lens into my ski bag. That lens was the lightest, smallest and cheapest Canon lens in production, affectionately called 'The Nifty Fifty'. This all plastic, bare bones 50mm lens weighs next to nothing, has a low profile, and costs under $100, or under ¥10,000 in my case. See the incredible pictures this thing is capable of after the jump.


I've never been a big landscape photographer, and most of my natural outdoor work is quick snapshots while walking around. I'd like to say these were planned and prepared for, but I was either in a moving car shooting through glass, riding a chairlift to the top of a mountain, or hopping from one frozen bare foot to the other on the patio in the early morning.


The 50mm f/1.8 is not world renowned for its quality, but it's a total sleeper hit. Most of these were taken between wide open and f/8, and the full sizes have amazing detail. This one in particular was shot, through window glass, while moving, wide open, and still has fairly good detail in the distance. It wouldn't be my first choice in a lens to use for the rest of my life, but it sure wouldn't be my last.

So if you're a canon shooter and don't have this in your bag, give up your latte for the day (that's one big latte) and grab this lens. It's nearly cheap enough to be disposable, fun to play and experiment with, and gives remarkably stunning results.

____________
Follow Me on Twitter|Be a fan on Facebook|Tumblr|Ustream

3/28/10

iPhone Madness


I do a lot of cell phone photography, starting way back when the first camera phones came out and gave you mushy, crap pictures that you had no way of getting off your phone without an expensive data plan. The iPhone is several generations removed from that now, and I love the combo of camera/editing software available for download.

I use several programs and I wanted to highlight some of them and why I use them. The pic at the top was taken just a day or two ago on spring break, and it went through 3 programs to edit and upload. Read through the process after the break.

After taking the picture, the first step was Tiltshift, which emulates the narrow depth of field thats been popular recently. It doesn't have to be used to make a picture look like it was a miniature model, you can use it just as effectively for a background blur and some good basic controls that are easy to use.

Next is Camera Bag which is a really cool emulator app. Vintage looks including 70's and polaroid, film looks like 'helga' and infrared and some other one-step edits are great to use.

The app I've been using the most though doesn't necessarily have the best editing or controls over any other app, but has a great uploading and social network feature. Chase Jarvis' Best Camera does editing and uploading to flickr, twitter, facebook, email and its stand alone social site bestc.am, all in one step.

There's no reason to only use one app to edit your cell phone pics, and while you may not be able to sell a book with exclusively cell phone images in it, I've seen some great work done with a cell phone that might not have otherwise been possible.


____________
Follow Me on Twitter|Be a fan on Facebook|Tumblr|Ustream

3/18/10

Eat, Sleep, Breathe-Photography


When you find yourself up late at night, trolling flickr for some cool stuff to look at, following every photographer you can find on twitter, and have a stack of photo magazines thicker than that other stack of other magazines, you're probably pretty into this stuff.

Welcome to the club.

I'm lucky enough to do photography all day, every day. I don't take vacations, I take trips with my camera. I don't call in sick for work, I do research in bed. And I certainly don't dread waking up every morning, unless it's really really early, and even then I manage to get pumped for the days shoot.

In other words, like many other people out there, I eat, sleep and breathe photography. If you're unsure if you have the symptoms, here's a quick diagnosis after the break.

EAT: Like consuming photography? Do you have bookcases full of how-to books, tech spec, gear pron and specialty magazines? Lists of contacts on flickr, following on twitter, fan of on facebook and every other social media site imaginable for you to check out their work? Are you subscribed to blogs like this one? Then you're a photo consumer, and an active one at that. Consuming photos is almost as important as taking them, it gives you ideas and direction, shows you things you may have never thought of on your own. Just don't forget to go out and try them too.

SLEEP: In addition to being at that age where pulling all-nighters is both necessary and possible, I'll spend more time thinking about photography before I go to sleep than any other time of the day-even when I'm working. Most artists I know keep a journal or notepad next to their bed, just in case inspiration strikes. Since my bed is currently 6 feet off the ground, I have to climb down and get on my computer, but you can use some looseleaf if you want to.

BREATHE: If I've learned one thing about photographers, it's that we love to talk. About photography. All day. While I was running the awesome Ann Arbor Strobist meetups, we talked about tools and techniques non-stop before, during and after our meetings. Even when the discussion drifted away from what we were doing, it would land right back down on another area of photography.

And that's why social media has found a huge amount of success in photography, or vice versa. We all love to share how we create images, what drives us to do it, and what's next on our list to conquer. The internet in general made it that much easier to do so, and moved the discussion out of the camera store and into the homes of photographers everywhere. Everyone from a first time shooter to a full time pro has something they want to share.

So, do you eat, sleep and breathe photography? If you're already here, I think we know the answer.

Phase 3, part 2


My self portrait-mom just loves it.

At what we first thought was going to be the end of phase 3 here at Hallmark, we got a few more assignments or "additional personal submissions" to do before we leave on spring break. A chance to break free, dust off our creativity that we may have left neglected in the corner, and shoot whatever appealed to us, keeping our final portfolio in mind.

My combo sports/action and portrait kept me fairly busy, waiting for the weather to break, which it fortunately did, and scheduling in some people to play the sports I really wanted to photograph. While it's always interesting to go find people online that will follow directions (i.e. please have the equipment required for the sport you want to portray), I did manage to find some great shots, in and out of the studio.

Another big thanks goes to Bob at Bikes Unlimited for continuing to let me borrow equipment to shoot at school. Here's some of my favorites after the break.


This shot was a rehash of my first attempt at shooting a bike in the studio. Going in the opposite direction for the background and then throwing in some props to support it. The first bike was held in place with 20lbs fishing line, which mysteriously disappeared, only to be replaced by 4lbs line for this shot. A whole lot of fishing line was used to make this shot stand up straight, as well as hold the helmet and shoes in their individual shots.


With my career plan wildly adjusted at the last minute to consider job prospects in LA instead of NY, I figured movie posters and celebrity portraits would be a good idea to have in my portfolio. A decidely Max Payne feel to this portrait inspired some cool art and graphics for other shots, but this quietly insane portrait of my buddy Wojo was just right for what I wanted to turn in.


A not so quiet shot, or series to shoot, Mike Esposito got angry for this and had the chance to practice his evil eye. The lighting for this was super simple, just two profoto striplights on the side, and a grid on his face to bring him up a little. I've been trying to avoid doing all low-key shots, a habit of mine from working in areas with less than attractive backgrounds, but I wanted a villain shot to mix things up a little bit.


And since I wanted to show versatility in both indoors and outdoors photography, with and without lights and equipment, this au-natural picture from the Mountain Dew Tour is getting put into the mix. This was during a practice run, when the athletes were more concerned with hitting the spot right in front of us for some face time than getting huge air. This was taken on a borrowed Nikon D3 and a 70-200 f/2.8, the lighting was provided by the curve of the halfpipe reflecting the sun right behind him, giving me some blisteringly fast shutter speeds and perfect sandwich lighting.

The self portrait way at the top was shot with four lights, two striplights on the sides, gridded background light, and beauty dish high right. The $1.20 grape flavored cigar from the Exxon station was lit in photoshop, and the hammer and sickle pin added in as well in post. The love of Vodka was not added in photoshop.

Next is spring break for a week, where I'll be shooting some video in Aspen, CO. and then trying my hand at Final Cut Express to learn editing techniques for an upcoming promotional video I'll be shooting at school on the 5dMKII, so be sure to keep checking back for more posts on what's in the pipe.

2/28/10

Phase 3 Roundup


Didn't manage to write much at all during our phase 3 at Hallmark, but it's been paying off to do nothing but photography all day, every day, with a little bit of sleep thrown in there. The 15 assignments were a mix of portraits, both on location and in studio, product photography and a bit of design thrown in for good measure.

The headliner here is a low-key portrait, done in studio. We're supposed to orient our portfolios to a certain field, and having to choose a direction helped more than I expected. While some students are still up in the air what they'll be doing after graduation, I managed to narrow mine down to sports and lifestyle oriented advertising. Just putting a name on it helped, even though I've been working towards it this whole time. See the highlights from my phase 3 portfolio and some personal work after the jump.


The last shot I did for phase 3 is one of my favorites. It came out almost exactly how I had envisioned it, and it looks like it should be blown up to 30x50 feet and slapped on a billboard. If they used billboards to advertise mountain bikes that is. The bike was shot as part of a design assignment, creating a brochure for a local business. Bikes-Unlimited's owner Bob was a great guy to chat with while I shot picture of him and his store to create their brochure, and even loaned me some equipment, including this bike to take back to school and shoot.


The other shot done for the inside spread of the brochure was again equipment on loan from Bob, and made me remember that I could really use some new ski boots, especially with some of the work I did this winter. If you want to shoot athletes on the mountain, you'd better be able to keep up with them.


But there's no way I'm keeping up with this guy, from the Mountain Dew Tour held up in Vermont at Mt. Snow. Freestyle skiing and snowboarding coupled with some fast cameras and front row seats makes some intense pictures.


A new friend that just happened to be from MSU back home and had made her way to Mass. ended up as a great replacement for some pictures I did a while ago when I was just starting out in sports advertising. The weather didn't want to cooperate, but that lead to a great tagline and some ideas for an entire campaign for me to shoot for practice.


And while our previous assignments did cover how to shoot glass in general, this picture, which ended up as my advertisement after being cut out was anything but simple. Turns out you have to drink the beer FIRST, otherwise the colors on the bottle go everywhere.


And of course, nothing goes better with that last picture than this still life, comprised of over a dozen shots. While food photography isn't on my top list of things to do, it's a lot of fun to eat while you're working. I like this one a lot better than my last food assignment, mostly because I actually don't eat the scallops or caviar featured in that.

Equipment wise, a lot of these were done with the Toyo 4x5's and leaf backs, including the bike, boot, beer and hamburger. The 5DmkII is getting it's fair share of time as well for the location portraits, and I even test drove a Nikon D3 for the freestyle skiing. That just cemented the need for me to be getting a 1 Series camera pretty soon, despite the Nikon being a great camera as well.

Portfolio review starts tomorrow for some students, along with a rumored 8 assignments to be shot in two weeks, this time of our choice. It's coming down to phase 4 and beyond pretty soon, and it's promising to be even more intense and demanding. New websites (including this one) are going up, contacts are being made, and careers are planned as the Hallmark class of '10 gets ready to break out.

1/20/10

Paul Mobley- Santa Fe Workshop


Paul Mobley is a commercial advertising photographer I assisted over the summer back in Michigan, before I moved out to Massachusetts. He's a phenomenal portrait photographer as well, and his book 'American Farmer' is an amazing collection of images from all over the US.

And coming up in March, Paul is teaching a workshop in Santa Fe on the art of the portrait. It's something that I'm sorely regretting that I won't be able to get to do, but that doesn't mean you guys should miss out. It's a pretty nominal cost to hang out with a great photographer who's willing to teach how he works, and to hang out away from your presumably cold hometown, if you're from my neck of the woods.

So check it out, and be sure to sign up soon before the last remaining slots are taken.


1/16/10

Holmes, Sherlock Holmes


Some of us just don't have the body type to be King Henry VIII, and I'd count myself lucky to be one of them. But with time running down on my art historical reference assignment, I was picking out a fat suit to go along with the outfit that was being assembled for me. A chance comment and a complete shift in directions later, I'm standing on Avenue A in Turners Falls, Massachusetts and trying very hard to pretend it was London, and I was the world's premiere detective, Sherlock Holmes.

I think all this would be too easy if I stuck to my original plan, and far less fun. King Henry as a photo subject would be stuffy, posed, and with the exception of a few wenches, likely to be uninteresting. Being able to switch gears as quickly as I did made the ideas come loose and fast, and let me leave a small mark on a literary great. Read more after the jump.


This picture was the one that will ultimately be submitted for the assignment, being based on a more modern day cover of 'The Adventure of Sherlock Holmes'. Location proved to be the only sticking point for this project. Making a small modern town look like 1800's London wasn't exactly easy. The street lamps were the main feature, and finding the right type wasn't going to happen in the short working radius I had around town.

Luckily, the buildings near a local tavern evoked a more retro feeling, with wrought iron fences, brick sidewalk and an appropriate replacement for the street lamps. While the artwork I was sampling from wasn't exactly a masterpiece, it did have good directional lighting, or at least I could imagine where the lighting should be placed. Those familiar with my other work will wonder how many lights, or how high they were turned up, but subtlety was much in play for this shot. A single profoto softbox, high up to give a sense of street lamp light was only at f/4 to make me stand out a little bit. The overall exposure was 1/25th at f/3.6. Shot on a Mamiya 645AFDII, iso 50 on the leaf 22 back.

The picture was toned in photoshop to match the colors on the cover, a little olive green. Curves darkened the sky slightly for that foggy London look, and that was it for post processing for this one.

The title picture on the other hand had serious retouching work to get exactly the right feel. A green filter on the sky knocked it down to the proper color, along with some burning to darken it even more for a much moodier feel.

1/10/10

Commercial Studio-Food


Food photography is one of those things I really hadn't looked into much before I came to Hallmark. I had done a shoot for a restaurant back home, but that was done more by the seat of my pants than anything.

Shooting food in the studio with a 4x5 is a completely different animal, and so is having to do the food styling by yourself. For this assignment, I wanted to go a little high class, and caviar seemed the way to go. Unfortunately, I neither like caviar, nor know anything about it. This one was going to require a little research. More after the jump.

I've never had caviar in my life, if you don't count the little orange stuff that gets served on top of most sushi. Seafood just isn't my thing, but I knew I wanted to shoot it for this assignment as soon as they detailed how they wanted to see thought and planning put into making the food look as good as possible. Caviar itself doesn't take much to look good, so you just concentrate on what you're serving it on.

That was a weeklong project, searching all over for different recipes, serving instructions, and examples. It came down to deciding between a very traditional serving, blini with sour cream and garnish, something crazy like a martini with caviar, or something in between.

I went more towards traditional to put the focus on the caviar instead of on the props or another food that the caviar would only be a small part of. Pan seared sea scallops on baby spinach with a dollop of sour cream and a mountain of caviar on top. The commercial studio went from zero to five stars when that dish was put out.

The lighting was simple, if the construction of the actual food wasn't. A single giant softbox overhead gave me nice, even lighting across the white plate, with the green vegetables, seared scallop with sour cream, and black caviar standing out in a curved pattern three deep. Most of the successful images I had seen used the repeating pattern, fading off in the background.

Positioning the food was the biggest challenge. Every time we moved a piece, the plate had to be cleaned with q-tips or paper towel. The spinach needed to be fluffed, the caviar shaped, the scallops rotated, and the plate tilted. I had a feeling going into this project that we were learning as much about photography as learning when to hire a specialist, unless you happen to be a chef. I'm not saying that I'm talentless in the culinary arts, but I'm much better at eating than cooking.

Our teacher explained commercial studio as a game of inches, but when your subject is only inches itself, it comes down to centimeters. Poking and prodding with toothpicks slowed the shoot down to a crawl as we made adjustments, but shooting tethered to my laptop made the process much more enjoyable and successful than in the past. Leaf may not know how to explain what an "Error FB' is, but their software is straightforward and reliable.

Check back sometime soon for a video detailing another upcoming food shoot, from concept to post production.