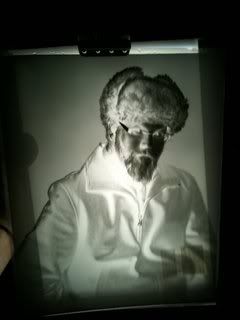
Getting the Burke and James 8x10 up and running was more of a disassembling process than a true restore. The aperture blades on the shutter started falling out when I decided to just go whole hog and yank out the aperture controls entirely, and shoot wide open with that huge piece of glass. While it has its disadvantages, it's still an amazing process. More info and some future plans after the break.
The process of shooting with this camera right now is somewhat involved. After loading the film (in a darkroom), the lights are set, the studio is blacked out, darkslide pulled, lights popped, darkslide replaced, and then lights on to reset for another shot. It can take upwards of 5 minutes to take a shot between composing and focusing, shutting all the modeling lights off on the strobes, and struggling in the darkness to find everything.
And then, because I'm like that, theres the developing process. No tidy tanks and reels like 35mm, or even medium format. Open trays of chemicals in a cramped bathroom pulling double duty as a darkroom (though thankfully ventilated). 13 minutes in darkness, constantly agitating trays sounds more like an OCD activity instead of a relaxing hobby.
Next up is doing contact prints and developing those in the same setup. First is doing a test strip on an ad-hoc setup. A softbox put right up against the paper, negative and a sheet of glass with cardboards to isolate areas while I check what power levels give what exposures. Barring a disaster in the developing, I should have a fairly reliable way to make prints without buying an expensive enlarger for 8x10's.
12/10/09
11/23/09
Betcha can't use just one, doc...
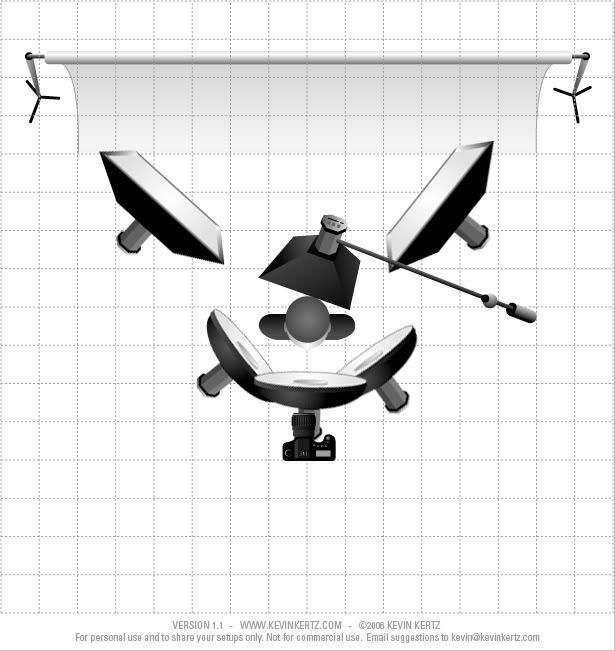
Why use one beauty dish when you have an entire school's worth of equipment at your disposal? That seemed like sound logic to me as I ransacked the the portrait studio bays next to mine of their lights, stands and beauty dishes. I could have gotten even more, but I didn't want to appear greedy. Photographers wax poetic about how gorgeous a beauty dish can be, and how if one is good, two is better. I never did hear anyone say if two is better than three must be overkill, so I went for it.
See a lighting diagram and more info after the jump.
It started innocently enough, I booked a model to do a shoot at the request of my retoucher back in Michigan. He sent makeup concepts, we picked a girl, and we were good to go. While the original idea was to have a lip-gloss centric shoot, we thought we would expand the number of looks we could get by starting with just the basic face and eye makeup first, then adding the lips in afterwards.
In the course of doing our initial shots, I noticed that my model had exceedingly long hair. Since most of my work has been lacking a hair stylist (this time as well unfortunately), I thought we could use the hair to frame and accentuate her face. My makeup artist wrapped the hair around her neck and held it to her back while I took a few frames, but I felt that something was lacking in the lighting. We already had a fairly large setup going, but it was typical of my older work as well. I wanted to push things a little bit.
In just a few minutes, I had three beauty dishes on booms positioned within inches of the model. The lightmeter that I had initially dreaded using was telling me to shoot at f/32 at ISO 50. Thats a whole lot of light, and they weren't even turned up the whole way.
I was afraid that I was actually taking a huge step back in technique, and that I would simply be blasting my model with too much light for the sake of using too much light. But even on the cruddy screen of the Aptus back, I could tell I had finally left that behind. Turning down the power slightly on the right beauty dish gave a little shadow for some definition and depth, but the overall light is even and smooth all the way across her face.
This shot ended up being a very last-minute submission for the best of college contest after a nearly sleepless night of retouching. It still has a little ways to go before being a final, polished image though. Sometime soon-Retouching post.
11/15/09
120 Marathon
Taking a huge step back in size, but a just a few steps forward in technology, I thought I'd show a few of the 120 film cameras that I've been playing around with since I started photography. Starting with the pictured 1967 Hasseblad 500c, it's a completely manual, utterly analog, electricity-less camera. And gorgeous to boot. Sure it may lack metering, precision shutter or film backs that are practically foolproof, but it's an absolutely amazing kit. It was previously owned by said portrait studio photographer that the 8x10 camera was obtained from, and it's in remarkable shape.
I'll admit that the Hasselblad has an allure about it, in part due to its lunar pedigree, and the current 50+ megapixel digital. And being primarily a Canon shooter, Carl Zeiss lenses are few and far between. This camera gave me the chance to use some vintage glass that promises to be even better than some modern day lenses. More toys, and a step in the other direction after the jump.
In complete and utter contrast to the Hasselblad's legendary mechanics and glass, we have my Holga CFN, which just decided to die sometime today. This was the first 120 film camera I ever owned, picked up between train stops from Hikone to Osaka, Japan. The 'dreamy', soft, messed up shots that emanated from this camera were more of a source of amusement for me than a real working camera, but weighing next to nothing made it easy to take along with me everywhere. While the shutter inside the lens is still working, the lack of a flash feature has doomed this camera to be disassembled, where its repair may be dubious.
My first twin lens reflex camera was this Rolleicord, a member of the Rolleiflex family. Slightly more compact than the Hasselblad, this came with a complete kit-leather case, meter, filters, lens adapters, and even one original magnesium-filled flashbulb. This was the first 120 camera that I would take outside to use as a normal point and shoot due to the surprisingly accurate analog light meter that bayonets onto the front. I also shot only black and white film, and used it to practice developing, with some help from my girlfriend.
But one of my favorite cameras is my RZ67, for several reasons. Not only did Annie Leibovitz use this type of camera for a huge amount of her studio work, I bought this while out in Seattle checking out Chase Jarvis' studio. I use this camera a lot of my own studio work, and it's so simple to use that I almost regretted getting my new Mamiya 645 for school. If I could have gotten my hands on the necessary adapter, I'd be using this camera instead. It has some of the best intuitive controls that I've seen on camera's like this, and the simplicity makes using it effortless. While it may be a bit of a beast in its weight class, I can comfortably handhold for an entire roll.
These are just my 120 MF film cameras, and while some may argue that it's even more irrelevant to have so many different ones when the only difference that matters is the film, I still feel that they're all appropriate for different situations, have different feels and even subject impact. The Rolleiflex gets stares and questions, the Mamiya makes people run the other way, and the Holga is ignored as if it were a cheap disposable camera.
Film may be dying out professionally, even as I start my career. But a surprising number of students still enjoy shooting film, and even some of them still develop in at-home darkrooms. Whether for nostalgia or for fun, film isn't going away quite yet. The people that still shoot film are the ones that will eventually be instrumental in saving it from extinction, just like in the impossible project's efforts to bring back Polaroid film to the huddled masses, but that's for another post.
11/12/09
It's Alive...
If film is dead, I want to be Dr. Frankenstein. I've been on such a film kick for the past year, it's kind of crazy. I've lost track of how many film cameras I have now, but I just added two very nice retro jewels to my collection. Pictured here is a Burke and James 8x10 view camera. this thing is a beast, I don't even have a picture of the full setup with the rolling stand yet. The camera itself weighs about 20lbs, is solid wood, and has definitely seen better days. But luckily enough for me, it still operates, sort of, and only took $1.04 in parts to get it back together.
Ever since our guest speaker at Hallmark, Barbara Bordnick talked about doing portraits with Polaroid 8x10's, I've been a little obsessed with the idea. The images she showed us were hauntingly beautiful, and I think that film is undoubtedly a more sincere way of capturing a true portrait. Sure its easier with digital, and sure no one may be able to tell the difference, or care, but its an entirely personal thing to me. This is as close to my photography as I can get.
Finding a cheap, used 8x10 camera was easy in my mind, but it took a little bit of searching. It wasn't until a craigslist ad listing cheap hasselblad film bodies did I even stumble upon this one. And to sweeten the deal, the photographer selling this equipment knew my portrait teacher here at Hallmark, Rich Barnes. The whole deal turned into a steal for me, and I wasn't even expecting to get what I really wanted. It was almost in passing that a pack of polaroid 8x10's, a processor and a holder were thrown in.
A couple of wood screws and some fiddling later, the camera is temperamental, sticky, and still just as heavy, but I can see an image on the ground glass. An 8x10 film holder is definitely needed before I try out what may be one of the few remaining packs of 8x10 polaroid in the world. But now, all thats left to do is check to see if the packard shutter behind the lens will sync with some pocket wizards.
Life and death appeared to me ideal bounds, which I should first break through, and pour a torrent of light into our dark world. -Victor Frankenstein
10/31/09
Sustainable Red-Wine
Phase one at Hallmark is winding down, and our final project is due in a week. One picture we have to shoot is a product with an appropriate background or location, and I just happened to pick up this cool bottle of wine from a local store. While driving back to the studio, I also passed a tree with some great red leaves that were falling. Some people driving past may have seen me picking leaves up off the ground and shoving them in a plastic baggie.
The cool thing about the commercial bays at school are that, right now at least, it's pretty empty after school. I get to use equipment from 2 or 3 bays instead of having to keep changing everything out when i start a new picture. Luckily, this was a fairly simple setup, but I think a few weeks of instruction and some lighting diagrams will do me good.
The setup, which I actually do have a picture of this time, was a little more complex than I've done in the past.
A softbox in the back through the infinity table, one in the front right for the bottle, and a third bare bulb underneath the table. No bounce cards, but I did have to black out the wall on the left side to get rid of some highlights. Post processing was cleaning up the bottle and re-arranging some of the leaves, curves, and some trade secrets.
It likely won't get used for class for one reason-they want us to be turn in lightroom edits only, and this shot, like most product shots, is a disaster till it gets polished. I'll definitely be holding onto this one for a while.
Keep coming back to check out new pics that will be getting posted, we're just getting started.
10/4/09
Hallmark in Motion- Weeks 3 & 4
After watching most of the class get jump started from zero to 'pro' photographers, we hit the ground running, literally. Our assignment this week included techniques on capturing motion, and my experience as a 'sportraiture' photographer came in handy. Josh was willing enough to run endlessly through dirty puddles in the unusually wet Massachusetts weather so I could get a great shot like this one. More after the jump.
Without 'distractions' like things to do on the weekends, we have plenty of time to throw on a jacket and spend a few hours in the rain. Josh, Colin and I took the day to do our motion assignment, and ended up with some great shots. Nearly running over Josh just so that Colin could get his homework done was priceless.
Coming up in the next couple weeks we have a few field trips, including one to New York for PhotoExpo, and to some smaller locales around the Massachusetts area. Assignments should start falling out of the sky any day now, and I'll have something a bit more interesting to talk about than how I captured movement with a fast shutter speed.
____________
Follow Me on Twitter
Join the Mailing List
9/27/09
Best Camera
I got on board with Chase Jarvis' "Best Camera" because I missed the way I used to take dozens of pictures on my cell phone before I even had a real camera. Having something that can grab the things you see every day in a split second is a great way to stay creative, take notes, and keep yourself occupied.
Having used the previous Jarvis approved camera app, I wasn't disappointed by the way the app handled, it had plenty of features and a lot more control than other iPhone apps. I miss some of the presets from Camera Bag, but the options in Best Camera aren't lacking, and the sharing feature that uploads to twitter, facebook, email and the Best Camera website is really cool, and I'm sure more features will be rolled out soon.
Overall, it's a great and ambitious foray into a web app and social site, and I've been going crazy editing a whole backlog of iPhone pics from the past year. Check it out on twitter or Facebook.
____________
Follow Me on Twitter
Join the Mailing List
9/19/09
Hallmark 2010- Weeks 1-2
So as most of you know, I'm out in Turners Falls Massachusetts where I've just started Phase 1 of the most comprehensive photographic education anywhere in the US. Weeks one and two blew by pretty quickly, with guest speakers and equipment being handed out, and our first assignment shot in neighboring Historic Deerfield. We're getting to know our teachers and their backgrounds, and getting settled into the program thats as demanding as they come.
Our week one assignment, with one of my final images posted above, was really an eye opener for me. Working mostly with artificial lighting, I usually never had to worry about the quality of available light. Having to work exclusively with said natural light put me on the spot, especially when the weather turned sour, giving us nothing but even, diffuse light for the entire day.
Read more and see some other shots from the day after the jump.
Coming from a very strobist background, having to deal with the giant softbox in the sky wasn't exactly intuitive. I've never had to work with models in all natural light, so it threw me for a bit of a loop when we had to photograph three different sets of subjects using it. The weather that day wasn't exactly cooperating, and trying to find a shadow was next to impossible.
Luckily, I still remember how to work without cranking down my exposure and blasting something with light. The above shot of Claudia was shot with an 85mm F/1.2 @ F/2.8 in the middle of a corn field we walked past. The new 5D Mark II creates literally noiseless images at ISO 50, and the color comes out fantastic in Photoshop CS4. Claudia, the 'model' for the day is another student whom I spent some time working with for our people assignment.
Another all natural light subject was more of an exercise in manually focusing toy lenses than anything else. Our not-so-little Chinese Sharpei friend here was excited by all the paparazzi attention he was getting.
Class is moving along slowly while all the students are brought up to speed, so I get a chance to relax and stretch myself on assignments. Keep checking back for more info on my new work and the Hallmark class of 2010.
9/11/09
Hallmark 2010
Finally, made it to Mass., and to the Hallmark Institute of Photography. Like I may have mentioned, this town (Turners Falls) is TINY. I mean, three stoplights and one main street tiny. From 1st to 7th street is less than half a mile.
But we made it through three days of orientation at the awesome school they have set up here. The equipment is all brand spankin' new, and the building is practically an oasis for photographers. Huge portrait and commercial bays, gigantic imaging and design labs, it's one heck of a place to do some work. I can see why some students 'lived' there all year. If they didn't have to kick me out every night, I'd just bring my bed and some PJ's. Read more about the school and our awesome guest speakers after the jump.
Orientation every day was ended with a lecture from a noted photographer, and while they're not exactly household names, they sure aren't obscure. First was Gregory Heisler, who's shot over SEVENTY Time Magazine covers, from Clinton and Arafat to Bruce Springsteen and Michael Phelps. He's also our 'Artist in Residence' for the year, meaning we get unfettered access to an extraordinarily accomplished photographer.
Next was fashion photographer Barbara Brodnick, one of the first major female fashion photographers. What I admired her the most for was these amazing 8x10 peel apart polaroid pictures of 'Women of Jazz'. It made me want to run out and get an 8x10 camera and beg Fuji to start producing film for me. She also had a collection of images for her three books on flowers, shot from perspectives that are so unique that she describes them more as landscapes than just pictures of plants.
Our final orientation week speaker was Clay Patrick McBride, who's shot a huge range of music talent including Metallica and Fifty Cent, along with NBA players and Japanese biker girls. He's also made the move to multimedia, delivering videos to his clients for 'online content', and was actually the photographer who inspired the well known stop motion music video of the girl walking on her bed. But his idea was much cooler, if not raunchier.
All three were amazing inspiration for a group of presumably nervous new photographers, many of whom haven't picked a direction to take their work in. For me, it was a great way to see the type of work that gets put on magazine covers, and to realize that I'm getting to that point. For the rest of the year, I'll be (trying) to blog about the whole experience here, to both document my progress personally, and to be a resource for new students who want to know more about the school.
My first impression? This is the place to be, hands down.
8/11/09
Meetup V-Mission Accomplished
Despite 90+ degree weather and the distinct lack of an air-conditioned workspace, we had a blast at our final summer meetup. While we changed the name (Strobist A2/DT), the incredible time we had with everyone stayed the same. Our only regret was that we didn't do this sooner and more often. With a group this successful, monthly meetups would have been easy to accomplish. Read about our final (for me) meetup and our plans for the future after the jump.
Our location was a repeat from an earlier meetup because of our time constraints, but with everything moving around as quickly as it does in there, we still had plenty of new places to shoot. Like a forklift, or a solar collector, or in a spate of daredevil behavior, from the rafters. New photographers and models created incredible opportunities to stretch our creativity, rehash old ideas, and collaborate on new ones. We've formed such a tightly knit group and gotten into a rhythm that we already know what our next step is going to be.
While this was unfortunately the last meetup I'll be able to personally organize and come to, the group is definitely not going away. Several of our members have stepped forward to donate their time and effort to keeping the meetups on schedule. And while I'll be away in Massachusetts, it's easy enough to book models online and keep myself involved in the group that means so much to me. It's been a privilege to work with everyone that comes to our meetups, and created more opportunities than I ever imagined.
From here, the new content I promised will start coming in, starting with some new equipment reviews, techniques and other ideas I want to share with everyone. School starts in just a few weeks, and lighting lessons will be coming in frequently as I pass on information that anyone interested in Strobist type photography will enjoy.
Also, as soon as some good, royalty free, non RIAA controlled music is made available, the video from meetup V will be posted as well. For now, we have a slideshow with pictures from all our members that attended.
7/21/09
Grosse Ile Airfield Video
Heres the long awaited (two days and change) video of our meetup! Check it out, and we'll see you at the next one.
7/20/09
Meetup IV success!
Meetup IV at the Grosse Ile Airfield was an absolute and stunning success, and we had a blast hanging out with some great photographers and models in a one of a kind location. Planes, snakes (and snakes ON planes), motorcycles, and oddly enough a hearse and casket were just some of the attractions this time. See everything we did and a slideshow after the jump.
Getting nearly unlimited access to a decommissioned military hangar is a great way to bring out some unique shots, and as always, this group did not disappoint. Everyone outdid themselves in their new work, and we're impressed with the variety of work getting put into the pool. We even had a celebrity appearance, Paul Mobley.
We tried a few new elements for this meetup, and everything came out great. We've gotten this down to an art and science, and we're ready to get right back to planning the next meetup in late August. Also, look for a video of the meetup, coming soon.
7/13/09
Meetup July 2009
We're looking forward to sunday with our hugely awesome meetup planned at the Grosse Ile Airfield. I'm immensely excited for some of things we have planned, this one is going to be beyond anything we've done yet. And don't worry, we're still looking at planning one more before the summer is over.
Apart from planning this meetup and getting ideas for the next one, It's been pretty busy with everything else going on. I'm in the process of packing up to move home, so I can pack up and move to Massachusetts at the end of August. I've had to put some of my personal work on hold to spend some time with my friends and family, so these meetups are really my only chance to work at all, apart from the occasional odd job that falls in my lap.
I'm also looking into producing a series of how-to videos for lighting, model interaction, and some cool DIY projects I've been working on. It was good getting the blog up and running, now we're going to kick it up a notch and make it even better.
Sneak peaks includes my latest project, a giant psuedo-softbox that I'll be using to shoot planes, cars and people this weekend, an editing how-to for photoshop, and our long awaited meetup video to make us look cool.
6/28/09
Strobist Ann Arbor Meetup IV
Thats right, we've had so many meetups I've had to go to Roman numerals. And as you can see by the lovely picture to the left, we have something that most meetup organizers only dream of; A de-commissioned airbase with a hangar for us to enjoy. We're also hearing some rumors of some equipment that will be available for props, pun intended.
We've been trying to get one of these for a while, but sometimes what we need is hidden in plain view. In this case, a member who has been to nearly every meetup just happened to know someone who happened to work at said hangar. He just hadn't seen the posts on flickr where we begged people to help us find one that would be open for use. More after the jump
The success of the last meetup is going to be hard to follow. We had a great location despite the mishaps, weather and other forces of nature, and we had a really great set of models, in addition to the types of models without legs. Or warm blood. But I think with what we have planned for this, it's going to be completely off the charts.
Scott, our snake handler is going to bring his menagerie for us again, and that's just the beginning. His custom bike shop Ghost Werkz (myspace) is also home to some great bikes that he'll bring in to be shot, as well as a couple friends who do some stunt riding.
We're working on how much leeway we have around the airfield, there's a whole bunch of stuff we want to offer that we just need to make sure is kosher with everyone involved. If this location works out well, I'm sure we'll want to come back...immediately.
In the meantime, don't forget to sign up now. No limits on models or photographers, we just need to know how many people to expect.
6/21/09
Strobist Ann Arbor Meetup Tres
The third Strobist Ann Arbor meetup was another great success. We had some great new models and photographers, and a returning group of people that we can count on to make things run as smoothly as they do. Our location, obtained last minute thanks to Steven, wasn't quite what we were expecting, but everyone made the best of it. Snakes, a band and a Kung-Fu master rounded out our attractions, making us fairly popular in the neighborhood for the day.
We've been doing these meetups for almost a year now, and after 3 full blown meetups and some smaller workshops, we feel pretty confident in our ability to plan these guys. We would like to have an easier time getting locations, but we're getting better at working our contacts to land us some cool spots.
Get some more info for next time, and see some more pics from the day after the jump.
All of our photographers have greatly improved since we saw them last, and we're seeing some really impressive work coming out of these meetups now. Working with new people is always a great way for everyone to learn and get new ideas, and sharing a setup with someone gives us opportunities we might otherwise miss out on. We have a core group of photographers that are really showing everyone what Strobist is all about, and these are some of the same people that are teaching at the AMP workshops as well.
We're already planning the next meetup for mid to late July, and we're penciling in plans for August as well. Getting locations is all we need to have confirmed before we start the signup process again. The more we do these, the better they get, and we're also pretty sure we're one of the most active Strobist group in the US right now. While most meetup threads on Strobist revolve around a lonely cry for someone to organize a shoot, ours is all about signing up for the next big event.
We've also started a dual mailing list for AMP and SAA, signup here for more news on meetups, workshops and other events being planned.
6/13/09
Strobist Boot Camp II
Strobist is to blame for me being a photographer, among other things. And while I was one of the late early adopters, I did see the site evolve into more of a product-oriented commercialized blog instead of a discussion on technique. Of course this isn't unusual, nor could I begrudge David of making a living off of all the work he puts into it, but it was still with some excitement that I saw new lessons for us to follow and try out technique were being posted.
The new bootcamp assignment was little more than a warm up stretch for a lot of us, but since my approach to headshots has been a little disjointed, I thought that taking time to plan out a well done headshot would be good for me. Of course, all my intended planning went out the window when my subject just happened to be hanging around while I was teaching a private workshop.
More after the jump.
Don Castle, another photographer at the Russell Industrial Center was watching me teach about studio lighting when I figured now was as good a time as any to get the assignment done. My student had only worked with one model for the day, and I wanted him to see the difference in lighting modifiers. Thankfully, he was up for a quick sitting. This portrait was shot with two lights, both WL 1600's. The main light was a high right softbox, giving some nice, soft but directional light. It was positioned keeping in mind that Don would be wearing his glasses. I didn't want to spend all his time fiddling with the light get rid of the reflections. The fill and rim light was another softbox over his shoulder, filling in the left side of his face, and providing a nice little highlight on the side.
The only mistake I could see was that we really didn't have enough light in his eyes, partially because he was squinting a little while I caught him laughing, and also because the main softbox was coming in a little high. Lowering it would have fixed that, but I really liked the falloff top to bottom.
And with the exact same lights and setting, throw in someone with a little less character in the face, and that nice fill on the left side becomes a vampire-worth highlight. The eyes are much more visible, though perhaps not as wise. Also, what the heck is up with my hair?
So while I didn't really plan as much as I would have liked, I got a lot out of this basic exercise. A new 2 light setup instead of my usual 3, an interesting subject who's full story I have yet to hear, and the knowledge that I can pull this off without having to spend hours planning. I work better on impulse than careful planning in most cases.
5/29/09
Techno X Watches
Not all that long ago David Hobby blogged about doing pro-bono work as a way to practice skills on subjects you might not otherwise get access to, and to help out your local community. I had the chance to shoot some menu items for a new restaurant across the street from me, and all I took in exchange was eating the food they wanted pictures of.
And that turned into this shoot, for Techno X Watches (site not fully up and running yet). Gorgeous diamond encrusted watches, and lots of them. If i hadn't done the shoot at the restaurant, he never would have found me, and a free job has turned into an ongoing opportunity.
Business practices aside, heres the full spread and how I did it after the jump.
I think I may have mentioned that I usually forget to take a setup picture when I do something cool. This time was unfortunately not an exception. A pair of sawhorses were supporting a sheet of glass that I had intended to use to make reflections, but ended up causing double images to appear, a big no-no.
A sheet of metal from my basement with a black paint job on one side saved the day. While it was dirty and scratched to hell, photoshop cleaned it up very nicely. Two white foamcores on either side provided some fill light from the small softbox directly above the watches. The light was being supported by a background stand, convenient, but just one way to do it. I would have preferred to be using my boom arm that was being borrowed.
The sawhorses and metal sheet were removed for the shot above, it was just the softbox and two cards on the sides. The position of the watches was the most important factor in composing this shot. We needed to show as much of the face as possible, on three watches facing different directions. And angling them wrong would cause the entire face to blow out because of the reflection.
This shot was done on the black reflective surface, with the cards and softbox remaining the same. Getting the right angle of the camera was the only hard part, while trying to make a compelling reflection that did more than just fall off.
In fact, the photography itself wasn't the hard part. The lighting setup remained somewhat static, usually only changing to fit in the swords vertically, or to bring in a second light for a little fill occasionally. The hard part, again, was the editing. For all the product photography I've done, theres been a certain amount of dust to deal with. And despite our best efforts, these guys were coated in it, even immediately after being wiped with a clean jewelry cloth.
Editing at 300% means you're covering an annoyingly tiny area, and each speck of dust has to be individually removed. Next time, I'm bringing canned air. The other challenge was a slight blue color cast on the inside of the faces, from the light going through the crystal and reflecting around off the interior of the watch. A brush set to saturation and on black removes all the color, but on diamonds and silver, you can't even tell. It makes the diamonds pop and look crisp and colorless like they should.
All of these pictures are (hopefully) going to be used in some promotional material for Techno X, so here's hoping that this is a tutorial for my first international campaign.
Follow Me on Twitter
Join the Mailing List
5/25/09
AMP Workshops
After a bit of a gap where I had to concentrate on school and getting the next Strobist meetup going, it's time to get another AMP Workshop going. The last workshop was really great, with four of us instructing over 20 people on location and studio lighting, products, wedding, and general portrait photography. The next workshop will also feature a photoshop segment where we'll show different techniques for editing your shots from the day.
We really wanted to make this class exceptional, and to be a great value as well. Offering the day long class for $100 per participant is going to include a whole bunch of stuff that wasn't available at our first workshop, or even at the Strobist meetups. We're also limiting the size to 15 people so we can really get hands on with everyone and make sure we cover anything you ask for. More details after the jump.
While some workshops out there are really just expensive lectures, we wanted to make the whole experience as interactive as possible. Right from the start, everyone is using high grade equipment, so nothing besides a camera is necessary to bring. Making sure everyone is comfortable using their camera is covered during the workshop setup, so even if you're a complete beginner, we can help you get right on track and shooting along with everyone else.
The intermediate and semi-pro level shooters will be more interested in the freedom we give our participants in how and what they want to shoot. We always bring in a large selection of models and rotate them frequently, so everyone will have unique shots instead of the same one over and over. We encourage dynamic interaction and want to make sure everyone gets a chance to try something they wanted to personally develop.
The locations change nearly every time to give new backgrounds and creative influences to each workshop. Some will be held in studios, various buildings, homes, and others outside in local parks and city streets to ensure new material for everyone. The classes change as well, depending on the guest instructors and available materials for each workshop. Our main classes for the next workshop are portraiture, product, location, and wedding photography.
So if you really want to get into a workshop that will give you the best experience in lighting and photography, the AMP Workshop will not disappoint. Everyone from beginner to semi-pros will learn something new, and take away an amazing experience. Participants are limited to 15 per workshop, so be sure to sign up before all the slots are taken.
Sign up using the form below, or at alexminkin.com
Follow Me on Twitter
Join the Mailing List
5/23/09
Meetup numero tres
Like the last quickie iPhone post says, we're up and running towards our next meetup on June 20th. Its being held at the Russell Industrial Center, which caters to the Detroit creative community, and it's one hell of a location. Tons of cool stuff is going to be at this meetup, you won't want to miss it. More after the jump.
Previous meetups have featured classic cars, motorcycles, ninjas and a over a dozen models for our photographers to work with. But this meetup is going to be even bigger and better, and some of the talent we're booking is out of this world. Not only are the models even better with some of our favorites coming back, but we're getting tons of non-traditional models to come as well. Suffices to say that its going to get a little hot in there.
We're not putting any limits on the number of people allowed to sign up like in the past, we're going all out to make this the best Strobist meetup ever. Its a long standing goal of mine to get our group featured on the front page of the real Strobist site, and this might just do the trick. We are still asking people to shout out and let us know who to expect, especially when planning food and how many regular models we'll need to keep everyone busy.
Details of the meetup like the time (10am to 8pm) and location (1600 Clay rd., Detroit) are available on the flickr page along with the sign up thread, which also covered a few FAQ's. More bits of info will get posted here and on flickr as we move closer to the date of the meetup. Keep checking back, and don't forget to sign up.
follow me on twitter
Join the SAA/AMP mailing list
Buy prints and more on CafePress
5/22/09
June 20th meetup
Quick post from the back seat of the car via iPhone. The next strobist meetup is being held in the Russell industrial center, June 20th 10am to 8pm. Signup is at the flickr page, and this one is going to be huge. More details to follow.
follow me on twitter
Join the SAA/AMP mailing list
Buy prints and more on CafePress
follow me on twitter
Join the SAA/AMP mailing list
Buy prints and more on CafePress
5/17/09
Assisting Paul
Not too long ago, I was fortunate enough to get my first real assisting job with a real, widely known photographer. Paul Mobley is a New York based portrait photographer, best known for his recent book American Farmer as well as his commercial work for the automotive and entertainment industries, among others. Paul was great to work for, and forgiving if nothing else when I made a mistake (like not getting the paper roll secured well enough).
Helping Paul gave me a lot of insight into how different people work as photographers. Usually I'm the one leading, or sharing with other skilled photographers. Paul was the first real pro commercial shooter that makes his living at photography that I got to see in action. It made me much more conscious of how I'll work in the future.
Paul was shooting material for his portfolio at the Michigan Basset Hound Rescue's event, where the main attraction was the dozens of floppy eared, belly dragging, sad eyed dogs. And their owners. While there was a fair amount of equipment there, it really came down to a lighting setup that I've used since my early days of strobist. Simple, easy to control, good looking light. Most call it 3 point, but we had 4 lights on this one to make life easier in post.
My job comprised mostly of keeping the paper backdrop intact (at which I somewhat failed, but we did keep enough to have the necessary background), helping lift the 60-85lbs dogs, hold them in awkward positions, hand out business cards, and help solve nagging little details like how to keep my monolights dry in a drizzle just wet enough to fry them.
In some of his shots, I'm actually right behind the subject, holding a dog in place. In a few others, I'm on the side waiting to be edited out later. For all the work we did on the backdrop, it ended up seeming like Paul was going to take care of it all in post anyways. A white foamcore behind any hair would probably have worked nearly as well in a pinch.
For my first real assisting job, it seemed very prosaic with very few wrinkles. It was fun, I learned a lot and finally remembered to ask some questions I had about his book, but towards the end when everything was worked out, all I had to do was run and ask people if we could borrow their dog.
follow me on twitter
Join the SAA/AMP mailing list
Buy prints and more on CafePress
5/6/09
Bombay Sapphire Commercial
In yesterday's post, I mentioned the Bombay Sapphire Gin product shot that I had been working on at the same time as the Corona bottle. As you can see, its a 'dynamic' product shot (ooh, its moving) and is one I'm rather proud of.
You can see the multiple curve layers at work, on the label, the bottle, the glass, even on the background at work here. The glass was a little tricky, some color creeped in from somewhere, but luckily when shooting clear liquids and glass, the 'screen' layer mode will basically retain the image while making it translucent for all intents and purposes in photoshop. The 'gin' being poured in is actually technically in black and white, and the whole pour and glass are separate from the bottle and on completely different layers. More tips and tricks after the jump.
A lot of the same techniques used in the Corona bottle came in to play here. The setup (and lack of a picture of it) was two softboxes, angled downards from the front and back of the bottle get nice, even lighting and make the highlights on the bottle. this was originally shot horizontally, but I switched it to vertical to maintain a little differentiation from the shot I for all intents and purposes did rip off in order to practice this, and also because a client would likely want their viewer to not have to tilt their head to find out what the product was. Not that anyone could mistake this beautiful blue bottle for something else.
But once it was rotated, the asymmetry of the bottle was revealed. cloning over the entire left side while maintaining the label gives it a much stronger and professional impact than if it were noticeably different one side to the other. There are a few highlights in the bottle than I may put back to their original form, but I rather like it. Hyper symmetry is no good either.
One thing I did know going into this shot, and that I decided against incorporating for several reasons, is that alcohol pours and appears different than water. Most people won't notice the difference, but alcohol pours much smoother and appears more viscous than water. In real product shots, the real product, or something made to mimic the real product is the final touch to ensure the image is perfect.
And again, a 10 minute ( or even less, just moving the foamcore to the ground, moving the lights and adjusting the tripod to use a different lens) setup, 10 minutes of shooting (took so long to go refill the bottle and empty the glass after 3 frames), it was just about an hour in photoshop. All was going according to plan until that 90 degree CCW switch, which revealed the bottle to be ugly on the (now) right side. the duplication of the left occurred after, as well as some futzing with the glass and the masking getting lost somewhere.
But, by 5 am, I did have another colorful product shot that I'm only slightly less proud of for the fact that it was not originally my idea. Credit goes to Rob Dowsley and his array of very nice product shots that makes me get off my ass and work on my own.
follow me on twitter
Join the SAA/AMP mailing list
Buy prints and more on CafePress
Corona Commercial
One of my bad photography habits is that I rarely post real setup shots. I can tell you how I took any number of my pictures, but for nearly all of them, I have no documentation. Normally this wouldn't even be an issue, but with photography the way it is nowadays, I like to share how I do my work, since thats how I learned to do it in the first place.
For example, this delicious looking shot of a bottle of Corona has no setup picture, but I can tell you it was taken with one frame, two softboxes on their sides, one on each side of the bottle. You need a large light source to make those nice lines in the bottle, because anything, and I mean anything remotely in view of that bottle will be reflected right back to you. More after the jump.
Bottles seem to be a popular litmus test for commercial photographers. The entire surface can become one giant specular highlight, and if not done right, you can tell. But once you figure it out, theres nothing easier. Until it comes to the post work.
That bottle took 10 minutes to setup for and shoot, and about an hour by itself in photoshop. And before you say that doesn't sound too bad, realize that where most people spend 3 or 4 hours in photoshop, I bang out my first copy in half an hour. I may go back later and fix what I don't like, but thats just how I work. Over an hour on any one photo? It goes to the trash at that point.
Most of the post work on products is spent cleaning up the actual product. First, removing dust from my dust-magnet of a sensor. Then actual dust on the product. Then any seams from shooting on two pieces of foamcore instead of one curved piece like a normal person, and then it gets really fun.
Theres about 4 curves layers in this Corona shot. I did another one with Bombay Sapphire Gin with twice as many. Two for the bottle, one for the label, another one or two for the glass, and a few for the background. Could I do it without using that many curves? To be honest, I don't know. By the time I have it looking the way I want it, condensing those layers would ruin it.
Then there's making everything symmetrical. For bottles, this is very important to me. Copy half the bottle back on to the other half, sometimes just a portion, like the neck in this one, or the entire bottle like I did for the Bombay after I rotated the entire picture. What looks good one way may not with just a simple rotation.
The Corona also required special attention for the foam in the neck of the bottle. 'Real' Corona ads feature a healthy amount of foam, and my bottle lacked it from sitting out for a while. Shaking the bottle would have put my prints all over it, as well as be hard to control. Having just a little bit was all i needed to clone-stamp and heal brush 3/4 of the foam visible in the picture. It's not quite as much as you would normally see, but it was much better than the original.
The lime took a quick touchup to remove some fibers, and some additional color put in. I sampled color off the rind, painted over the insides and put the layer to overlay to give it a little boost in color, backing it off in opacity. This of course gives me the option to come back and adjust it at any point.
After each individual part is fine-tuned, I promptly ruin it all by throwing one more curve layer on top to even everything out. the color background is added in with a 250px feathered oval selection, and a mix of straight fill and gradient. The color is sampled right from the center of the beer, so everything matches quite nicely.
Shooting products isn't nearly as glamorous as shooting models, but when its 4 AM and your girlfriend is sleeping, you don't really want to start moving furniture and inviting people over.
follow me on twitter
Join the SAA/AMP mailing list
Buy prints and more on CafePress
4/14/09
Beauty and the Soft
I started using studio lights bare, but quickly moved in to collapsable softboxes made my my light manufacturer, Alien Bees and White Lightning. But shortly after, I grabbed a beauty dish, and then a second. I religiously used the beauty dishes whenever possible, trying to understand how they affected my light. Softboxes are easy to understand. Giant light sources with lots of output, and a great, soft light that falls off beautifully when applied correctly.
But beauty dishes completely threw me. I couldn't understand how to make them work for me, despite understanding the basic tenant of lower output, supposedly more wrapping light. I tried them in every situation, even when it may not have been the best choice of a modifier solely for the fact I wanted them to work. I needed them to work.
Keep reading after the jump.
But not matter what I did, I was unable to wring out anything exceptional with the beauty dishes. They did work great at the AMP workshop when I used them all day long without even having to think about it. But when it came to indoor studio work, I was stymied. I went back to my giant softbox and realized, despite its aggravation (this thing is nearly as tall as I am, and I'm not exactly short), the softbox was exactly what I needed, indoors and out.
I got the softboxes after using umbrellas for a while, first with hot tungsten lights, and then with my first set of Alien Bees. Umbrellas are great modifiers, and I'm learning to appreciate them again, but its a little hard for me to shake the feeling of being a mall photographer with the two umbrellas in backwards lights. Seeing Annie Leibovitz and Jill Greenberg using them made me feel much better, so two or three giant silver umbrellas are on my list now.
The reason I left umbrellas in the first place was the light spill in studio, which softboxes have very little of. I learned how to control the softboxes easily, they're very directional and give great even lighting. However, outside on location photography, umbrellas will light a huge area without any distracting dramatic falloff, if one should choose to avoid that. Softboxes are great for outdoor closeup portraits, but for environmental pictures, lots of harsh shadows can be caused by having light thats too directional.
But those #(@* beauty dishes drove me crazy. Hot spots, never able to get the correct exposure no matter what I adjusted. I almost threw them away, which would have been very bad. At the least I would have turned them into giant salsa and chip bowls.
I haven't yet accepted beauty dishes into my life again. I'm not ready for that commitment until I have a studio with an infinity wall and a mannequin to practice on. No model has the inhuman patience I expect this to take.
follow me on twitter
Join the SAA/AMP mailing list
Buy prints and more on CafePress
4/4/09
Workshop
The first AMP Workshop was, as is the norm for this group, another amazing meetup. It looks like everyone enjoyed the variety of classes we offered with the hands on learning that some of those other workshops are lacking. Despite being a little sunburned by the end of the day, I had a great time teaching about lighting on location. Once again, the models were great, and everyone walked away with some portfolio-worthy stuff.
The next step for both AMP and the Strobist Ann Arbor is another general meetup in mid June, so keep checking back for when a date and signup is announced. More details after the jump, along with some general info.
Because of our highly involved and generous members, we've been able to offer some incredible opportunities for photographers of all skill levels to come and shoot with us. We've brought in dozens of models, classic cars and props to an awesome location donated by Jeff. I keep telling these guys that all I'm good for here is booking the models and printing a sign in sheet. So far, these meetups just can't go wrong. I'm very pleased, and a little proud of myself for bringing together such an awesome group of people.
I'm especially pleased and proud of the AMP workshop since I had the opportunity to build it nearly from the ground up. Splitting them apart this early also gave me the chance to define how it was run and who helped me do it, instead of getting stuck in a strictly Strobist format. Of course, the element that will never change is how we share this experience so we can all practice the hobby (or profession) that we're all a little too obsessed with.
We're already in the early planning stages of a huge meetup for mid June, and we're really pulling out the stops for this one. If you've seen Chase Jarvis' Seattle Strobist Meetup, thats sort of what we're going for. We really want to put Michigan on the map for photography, and if this next one doesn't do it, nothing will.
There are now three pages for you to check up on. Aside from this blog, there's the new AMP Flickr Page here and if you haven't joined the original Strobist Ann Arbor Page, its over here. If you don't have flickr, be sure to sign up as those two pages will get updated more frequently with info on the next event.
Until then, keep shooting.
follow me on twitter
Join the SAA/AMP mailing list
Buy prints and more on CafePress
4/1/09
Strobist Macro Pt. 1-Products
Macro photography opens entirely new worlds for us to view. And luckily, the best thing about macro is that any subject, when enlarged several hundred times, becomes infinitely more interesting to view. With an entry level macro lens costing only a few hundred dollars, more and more people venture into it.
However, one of the harder aspects of learning macro is how to light it. High apertures are typically used to get good sharpness and depth of field to show tiny details, and to combat the razor-thin DOF. Luckily, if you're into Strobist type photography, all you need is the most basic setup to get started. Keep reading after the jump.
While it helps to have a ringflash or real macro light for doing serious macro work, your off camera flash will do just fine as well. In this setup, a single 430ex flash attached to a (now broken and in service) magic arm for easy positioning. When shooting macro, your light source can be as close as just 4 or 5 inches away from the subject. A modifier is generally a good idea, but if your subject is small enough, its not entirely necessary.
The next thing that I've found to be necessary is bounce cards, whether a sheet of foam core or an empty white cardboard box, a reflective surface opposite your light effectively doubles your coverage. Positioning this carefully will also take care of catchlights in reflective surfaces. This is a basic setup-one flash, one bounce, camera centered in between. But as uncomplicated as it is, it produces very and controllable results that anyone can do in minimal space.
This picture of my watch shows how you can simply light even highly reflective objects easily. You can see the direction of the light coming from the top right. The metal bezel is hardly lit, but the face is evenly lit, with a bit of shadow at the top creating a very dramatic product shot. Moving in more bounce cards would have more evenly lit the entire watch, or even better, a second light directly opposite the main light would have created symmetry from side to side. Such a small setup is easy to manipulate one light at a time.
follow me on twitter
Join the SAA/AMP mailing list
Buy prints and more on CafePress
3/16/09
AMP Lighting Workshop-Beginners
After the Strobist Ann Arbor Meetup, Jeff asked me run a lighting workshop so we could do smaller groups, more in-depth discussion, and really work on some techniques that are common in the Strobist world. We're still in the early planning stages, but with me being short on time due to a possible internship and graduation coming up, we have to move right along to squeeze in as much as we possibly can. Keep reading after the jump.
Right off the bat, we picked out some subjects to cover at the first AMP lighting workshop. Tabletop and product photography, on location lighting, small flash lighting, studio portraits, wedding photography, and big objects. We're also bringing in some of the advanced members that attended the meetups to teach their area of expertise.
An overall smaller group size broken into several classes that rotate will let us really answer everyone's questions and give everyone plenty of time to practice the techniques. It will also be shorter than the regular Strobist meetup, but we'll cover more material.
The best available date is looking like April 4th, a little short notice, but we'll make it work. Keep checking back for updates here and on the Ann Arbor page.
follow me on twitter
Join the SAA/AMP mailing list
Buy prints and more on CafePress
3/15/09
Meetup Success!
Strobist Ann Arbor Meetup Redux went off with hardly a hitch at all, and the turnout was amazing. Over 40 people attended, and the pool is starting to flood with some awesome samples of the work that went on there. Keep reading after the jump
First of all, I want to thank everyone for coming, because obviously without all of you, it's just me in a warehouse. And of course a huge thanks to Jeff who donated the warehouse for us to use right when we were on the verge of scrapping the whole project. Without him, this never would have happened.
I've been poking through everyones flickr streams, and compared to the first meetup pictures, I'm very impressed. I saw huge improvements in a lot of people, whether they got new equipment or had been practicing, the results are great.
Everything went nearly as we had planned, though it fell apart a little towards the end as people had to leave. It was definitely a long meetup, and with as much cool stuff as there was to shoot, I'm just glad I had enough energy to drive home after. The guys in the back won the 'Last Strobist Standing' award, still shooting when I had to pack up and leave.
Keep checking back here, the main site, and the Ann Arbor page for details on the next workshop and meetups. As most of you have probably heard, I'll be moving to Massachusetts for a year at the end of the summer, but rest assured, I'll make sure everyone is well taken care of, and we'll see if we can't schedule a meetup to coincide with a weekend that I'll be home. A few of you have generously offered to help in the planning, and I'll be counting on you and others to make sure it goes great, whether I'm here or not.
I know it's not quite as cool as being posted on the main strobist page, but I'll be checking with people to use their pictures on the blog and for future promotional material. For now, you're stuck with just looking at my awesome models-Shira, Ryan, Darrin, Danielle and Dana.
follow me on twitter
Join the SAA/AMP mailing list
Buy prints and more on CafePress
3/10/09
How to run a strobist meetup
Step 1: Get a bunch of photographers to sign up, promising gorgeous models, free food, and an awesome location
Step 2: Convince models ranging from beginners to pros to sign up. charge for food. lose location, find another.
Step 3: ????
Step 4: Profit! But not really, I'm running this thing at a loss just so I can hang out with some really talented people and develop a few ideas I had wanted to do.
I've learned a lot while organizing these two meetups. While our first one was pretty successful, it was a little slap-hazardish, in a 'that's good enough for college students' kind of way. Which really wasn't bad, considering it was put together by a couple college seniors with no experience in event planning. We might have missed a few details, but we had such a great turnout of people that gave us all sorts of help and advice, we dove straight into planning this one without a second thought. More after the jump.
It took a while because of location issues (they can't get our transcript audits right, why should they know who's scheduled to use the gym?) but we did have a member jump in and save us with an offering to use his warehouse (thanks again, Jeff), and it just exploded from there. I'm not sure what the actual date was that we opened up for RSVP's, but it sure went by fast.
This meetup exemplifies everything the Strobist movement is about-interaction. Not gear, but getting together a group of like-minded people and turning them loose. The effort put forth by almost everyone to bring together everything necessary to make a meetup of this size work has been incredible, to say the least. We might not have gotten front page on the Strobist blog yet, but I think we're pretty close to getting a nod from Mr. Hobby himself.
I'm looking forward to seeing everyone again (and meeting all the new people) at what is definitely the biggest free photographic event in Michigan.
until then, keep shooting
follow me on twitter
Join the SAA/AMP mailing list
Buy prints and more on CafePress
3/9/09
Strobist Meetup
It was suggested by one of our Strobist Ann Arbor members that I should start blogging about our group, the meetups we arrange, and other info relating to Strobist and my photography in general. I think that this time, I might actually have the site traffic to warrant the effort of typing this stuff up. More after the jump.
Our second meetup is this weekend (March 14th) and to say I'm excited is an understatement. It took a bit more effort to get this one off the ground than our first one, but the results look much more promising. Bigger, better, and with more models than you could shake a stick at, it's going to be incredible.
Some highlights of this meetup include a kickass warehouse to work in, full of industrial equipment, a couple cars, and a bunch of toys to play with. I'll be bringing a bunch of props for everyone to use, and doing workshops on lighting people, action, and big objects.
If you didn't make the sign-up for this meetup, fear not. We'll be having more in the future, and if I ever get an airplane hangar, space won't be restricted at all.
follow me on twitter
Join the SAA/AMP mailing list
Buy prints and more on CafePress
Subscribe to:
Posts (Atom)